Browsing Category

Decorating

10 In Adventures/ Decorating

Farm Fresh Thrift Challenge

I so enjoy the thrill of the hunt.  Yard sales, antique stores, thrift shops, old houses – you name it, I want to poke around.  And a looooong time ago, we did the Macklemore Thrift Challenge with Young House Love.  And its high time we did it again!

Do you remember the song? You can listen HERE if you’d like, it never gets old, the swearing might be too much for some….I warned you, though!  I chuckle every time.  Then Young House Love threw down the challenge to spend $20 in an old blog post HERE with a follow-up post HERE.  And I took them up on the challenge, which you can read about HERE.

It’s so fun to connect over thrifting so it’s time for another round.  Every time I share my finds on Instagram, people always comment so I know I’m not alone in my love of thrifting.  And with New Year’s resolutions going strong and the Marie Kondo series on Netflix, thrifting is at its prime!

Who wants to thrift with me? Budget limit is $20.  Photograph yourself with your $$$ and send me the pictures to show you are in within the next week-ish.  Then, on February 18th, or before, send me a picture and description of the goodies you found!  It’s as simple as that!  I may even share your pictures in the blog or on Instagram down the road!

If you are into the whole social media thing, use the hashtag #thriftingwithfarmfresh to share your selfie, your hunt and/or your treasures!!  I’ve already talked two friends into it with – who else will join us!?!?!?

I’M SO EXCITED!!

Colourfully yours,

Lori


2 In Decorating

Colour – Red

As promised, each month in 2019, I’m going to share information with you on a specific colour.  This month, for the kick-off, we’re going to start with my favourite.  Red.  

I thought we could look at a few things about each colour we explore.  We’ll talk about the colour itself, the way it impacts us in our home, some of my favourite reds and how I use red in our home.

I don’t know when I first fell for red in my home, but I love it and use it all the time throughout our current house and our previous house, too.  I find that a lot of people are afraid to use strong colours in their home and without some contrast, sometimes an interior can fall flat.  I especially love paired with turquoise but we’ll get there…

Red, when used in your home, demands attention.  Your eye is immediately pulled to it. Red creates excitement in a space.  A room, such as a powder room or dining room can handle dramatic red walls. But it can be overpowering when used on all 4 walls in a bedroom or living room.  Red, being one of the primary colours, is bright and bold, perfect to add a pop of colour to a classic exterior, or to give a nautical nod to a cottage and of course, great fun for any kids space, too.

In our home, we have red accents throughout the living room, kitchen and dining room.  It’s just one of those colours that makes me happy.  Our curtains are red, our huge living room rug has red in it and of course I can’t forget our chippy red dresser that holds the TV.  Red pairs well with the turquoise and navy I like to use, too.  It keeps our home fresh and fun, I’m not one to keep things too serious and formal…although I am a sucker for a pretty Persian rug…

Red a great, classic colour for old time country vibes – think old red barns, painted buckets, lanterns and stools. There’s nothing prettier that faded red paint from long-gone eras.

The girls have both slept on the old, wooden twin bed that is painted a bold red.  In fact, Hannah has requested that it makes a return to her room.  I will admit, it is my favourite, it was in the spare bedroom in our first home which later become the nursery and since I’m a sentimental fool, I’ll gladly lug that bed in for Hannah.

My favourite red paint colour from Benjamin Moore is Bonaparte, CC-64.  And if I’m painting a treasure out in my studio, you know I’m going to turn to Miss Mustard Seed’s Tricycle.

I hope you’ve enjoyed this little detour into the colour Red.  When I decided on Colour for my Word of the Year, which you can read about HERE, I thought I would tap into the lessons I learned when I was studying Interiors.

What do you have that is red in your home?

Colourfully yours,

Lori

2 In Clear Day Farm/ Decorating

A New View

We are not high maintenance people by any stretch.  But we have something in our home now that might make you think otherwise.  Remote control blinds.  Sounds fancy, right?

I have been selling blinds for nearly 20 years now.  It’s all part of my job to help my clients find window coverings { or furniture or flooring or whatever } that suit their needs and home.  And I have to admit, after selling thousands of blinds, I never knew just how much I would enjoy having blinds on our living room windows.

For us, privacy isn’t an issue, we live in rural Nova Scotia and our road isn’t very busy. Even the north and eastern exposure doesn’t cause too much trouble, except on the rare day when the sun shines in on the right angle and hits the TV.  So, really we don’t need blinds.  We have curtains on the windows but they are very rarely closed.

Part of the thing about selling blinds is knowing what products are out there and of course, I like the ones that are a little on the expensive side.  But when a special sale for Hunter Douglas dealers cames up and your boss makes you an offer you can’t refuse, you go all in.

And that’s how we ended up with two PowerView Silhouettes in our living room.  And guys, I can’t imagine life without them now.

For those of you who aren’t familiar with Hunter Douglas’ Silhouette line, it is a shade that has two layers of sheer front and back, with a fabric vane in between the sheer layers.  This means it will filter and diffuse the light coming in the room when the blinds are open but when they are closed over, they offer privacy.  And they also provide a nice layer of insulation, too.  They also can roll completely up into the headrail when you want the wide open view to the outside.  So they are a very functional product, but they are also oh so pretty.  The fabric we selected has a nice natural texture to it so it doesn’t feel too formal.

Then with the remote function, it means you can easily open, close or louvre the shades from the couch.  No stretching over the furniture to access a cord to raise or lower them, just the simple push of a button.  I’ll be honest, I never really saw the need for the average room to have remote blinds.  Unless you had very obvious windows that were out of reach.  But, let me tell you, the PowerView is awesome.  When we had our tree up in front of the window, the remote was perfect.  Really, we use it nearly every day now.

Here’s a reminder of what our living room looked like when we moved in…

And now….with blinds opened and closed….

It’s so cozy at night.  Or if the girls are watching TV, then they love to have the shades closed so that it’s darker and all snug.  I always loved our living room, it felt inviting but I really do think it has now come up a level.  And I should know this, right? Lol, and yet, here I am gushing about the difference it made.

Even though this isn’t a sponsored post, I do want to give Karl, my boss, a shout out for offering this special to us. { and for being an amazing boss in general! }  I didn’t know I needed these blinds but now that I have them….

If you want to chat blinds with me, let me know.  I love geeking out over the products and possibilities that Hunter Douglas offers for solving UV, privacy or light control issues.  Or if you have a design project you are thinking about doing or are in the midst of and need expert advice, I know we can find a way to help.  You can find me at Costandi Designs on Facebook and Instagram.

I’m off to play with the new blinds 😉

Colourfully yours,

Lori


2 In Decorating/ Make Something

DIY Pompom Garland

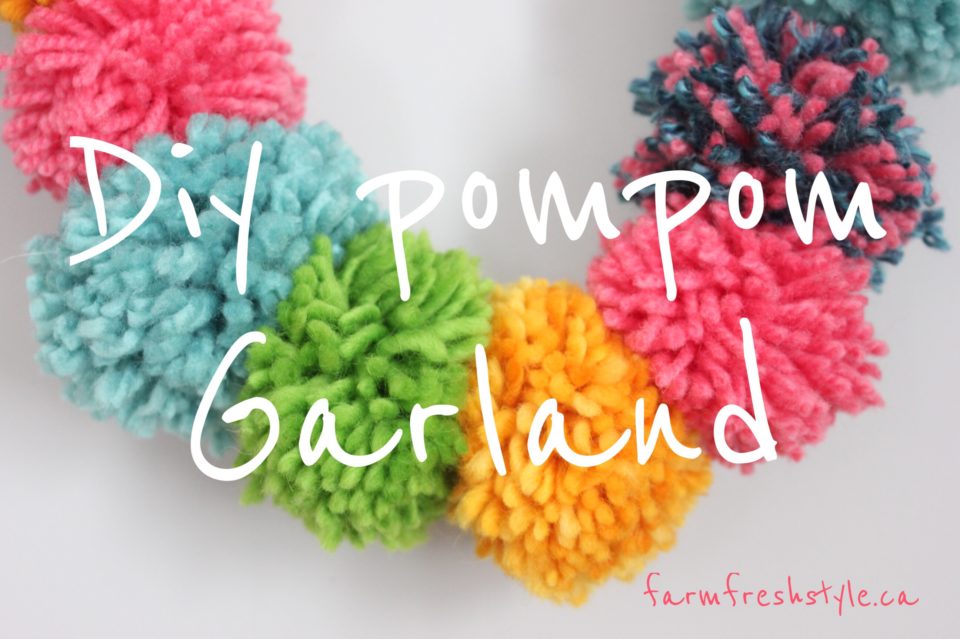
This past Christmas I decided I wanted to add some more colour to our tree.  It wasn’t quite as bright as I had hoped, in part because I didn’t get to make all the decorations I had wanted to.  So I sat down one night while watching Netflix with the handsome Mr. Byrne and started making pompoms for a garland around the tree.

Making pompoms is a fun way to get to own/purchase/shop for yarn.  I word it like that because I love yarn but I don’t knit or crochet so I started making pompoms well before I started weaving.  Now, with weaving, I have a lovely suitcase filled to overflowing of lovely yarns and fibres.  And, the nice thing is, pompoms are super fun and easy to make.  The girls made a bunch around Christmastime, too, they raided my yarn stash plus Hannah has a bunch of her own yarn, too.


The first step is to select your colours.  I used brightly coloured yarn, some was 100% wool and others were acrylic or whatever, and for this project, the content doesn’t matter, more the colours that I wanted.

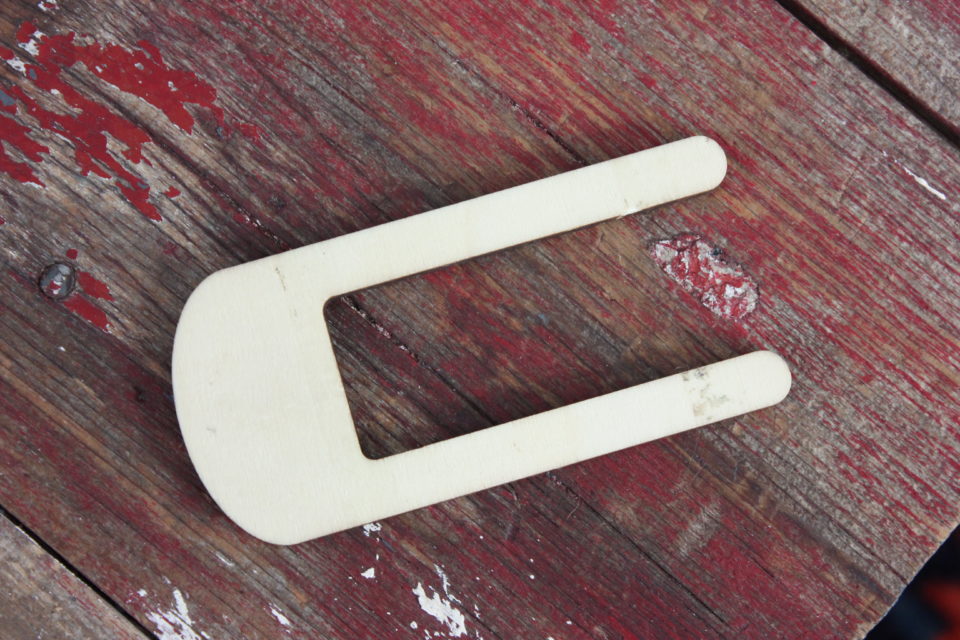
We have a wooden pompom tool that came in a small loom kit we found on sale at our local Michael’s store.  It makes it very easy to whip up a pompom in no time flat. There are other tools and ways out there you can make pompoms, too, but this was handy and so I though I’d try it out.

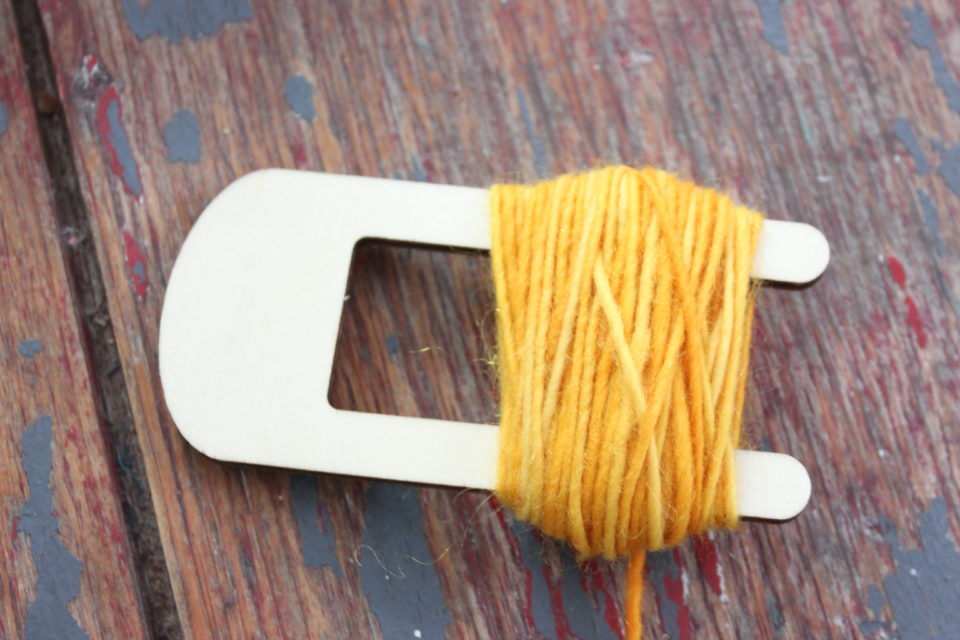
You simply wind the yarn around and around the prongs.  The more times you wrap it, the fuller your pompom will be.

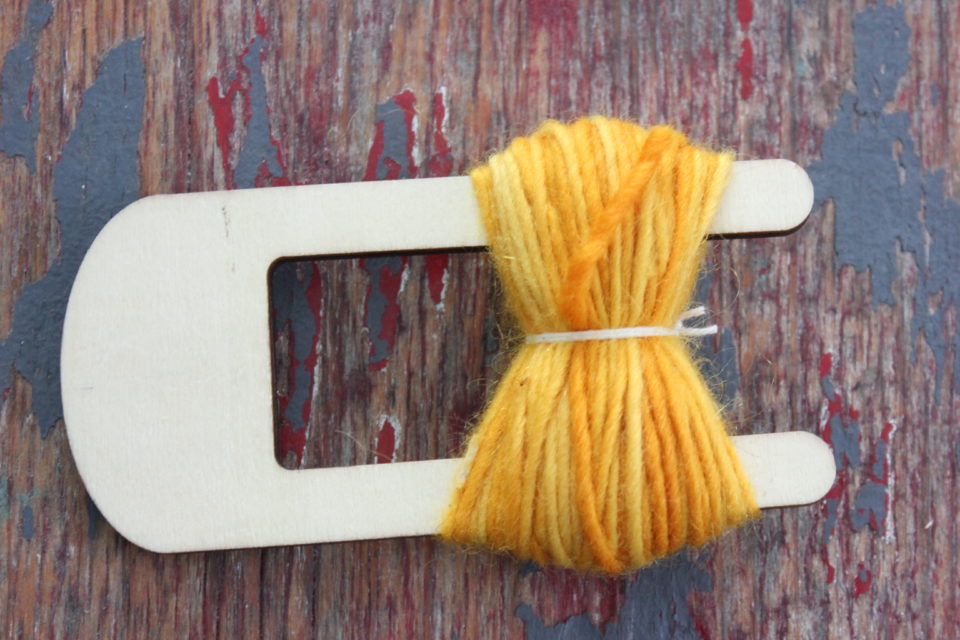
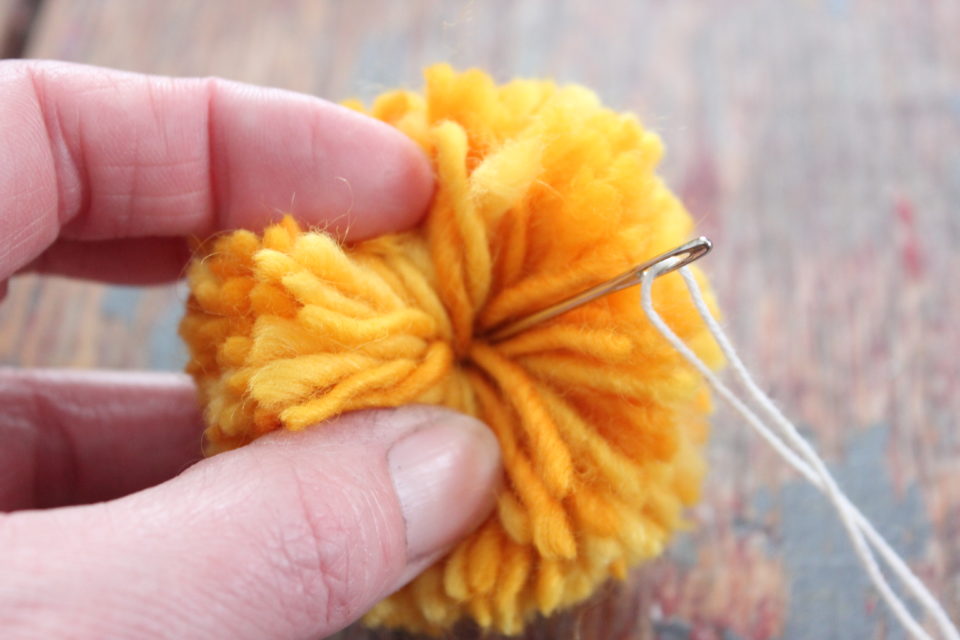
The next step is to tie off the middle of your pompom.  I used my warp thread for weaving, it is thin and very strong, so I could pull it tight without worrying about it snapping. I wrapped around the center twice and then knotted it and cut my ends off.  If your pompom is full enough, you won’t see this string.

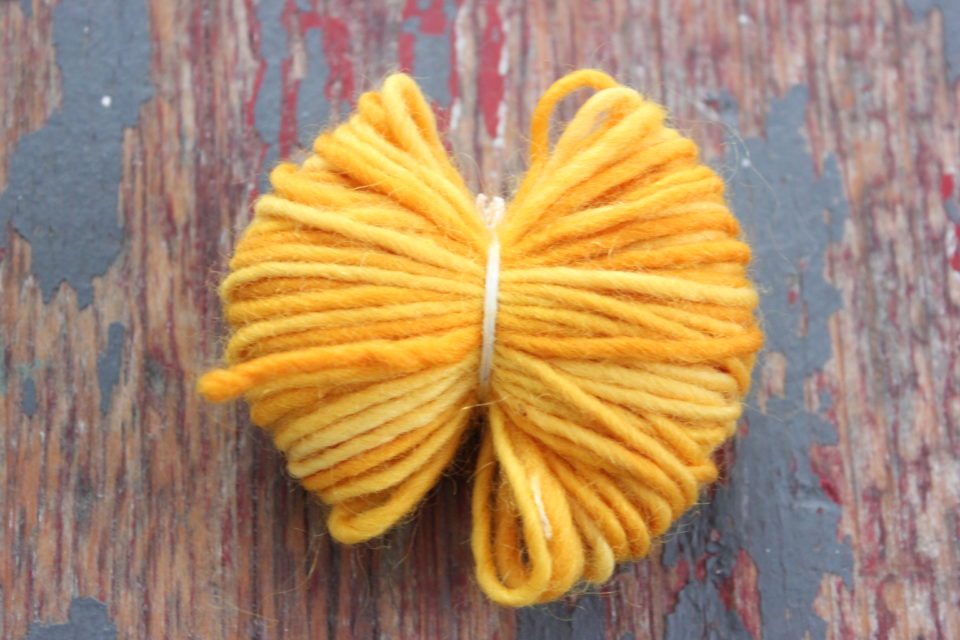
Then you slide your pompom off the prongs.  You can see I didn’t get my strings perfectly in the center, you may be able to slide the string but I wasn’t overly worried about, once it is gathered against the other pompoms, you won’t even notice it.

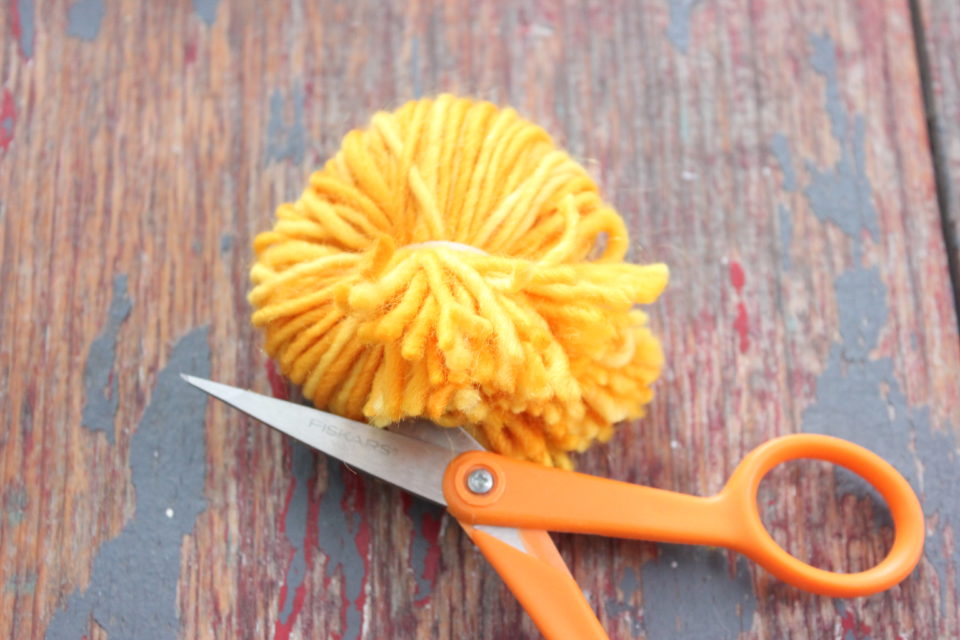
Then you grab a pair of sharp scissors and cut your loops.  Dull scissors will only drive you mad, trust me.

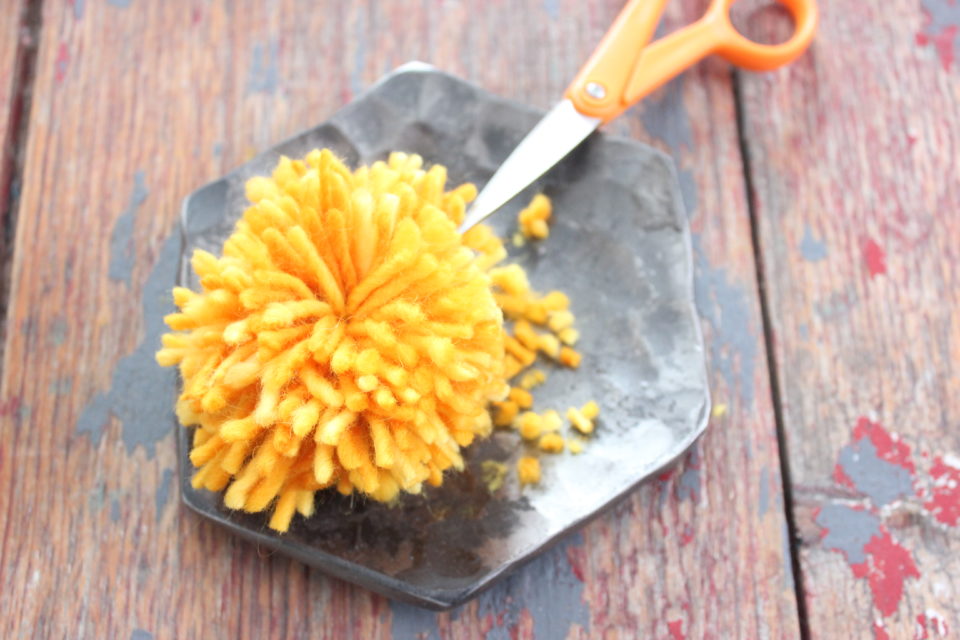
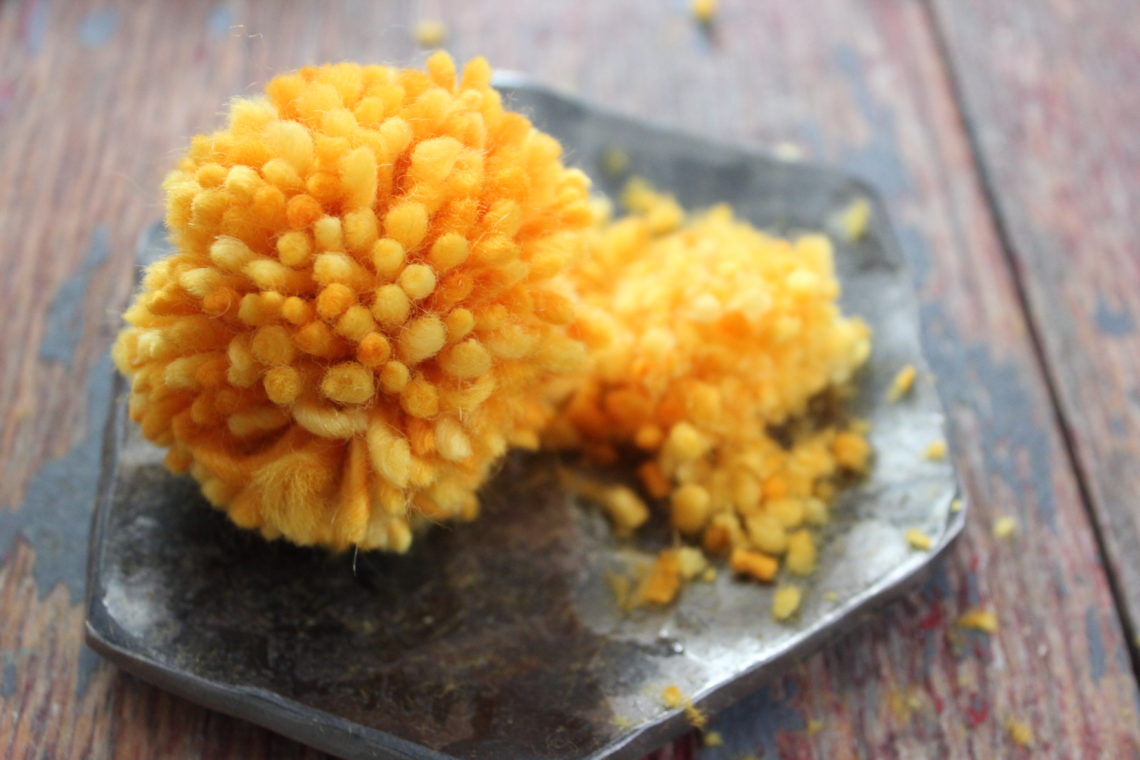
Then comes the fun part, fluffing and trimming your pompom.  The left side hasn’t been trimmed yet and the right side had been.  Every once and awhile when I’m trimming, I’ll give it a good shake to fluff it up so I can see where any long sections are.

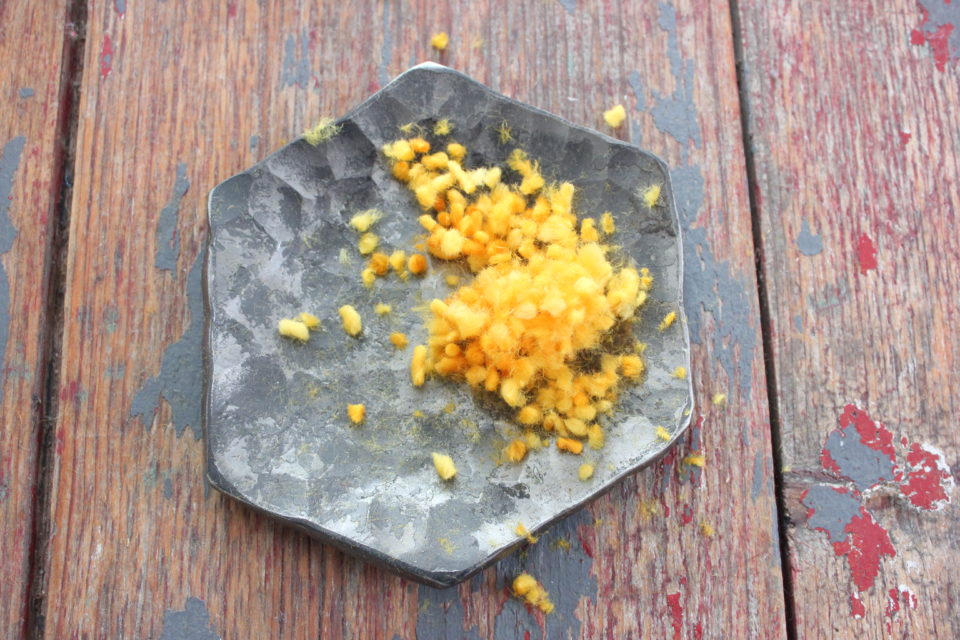
These fluffy trimmings are just so fun against the iron of this little dish, I just threw it in here because it brings me joy. 🙂

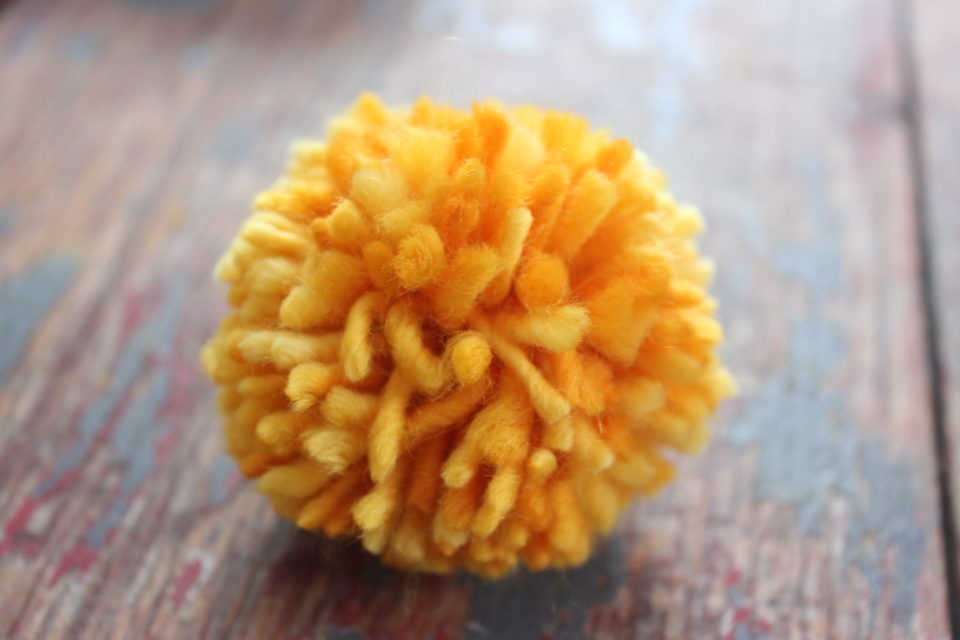
After you are happy with your trimming, you have a pompom!!!

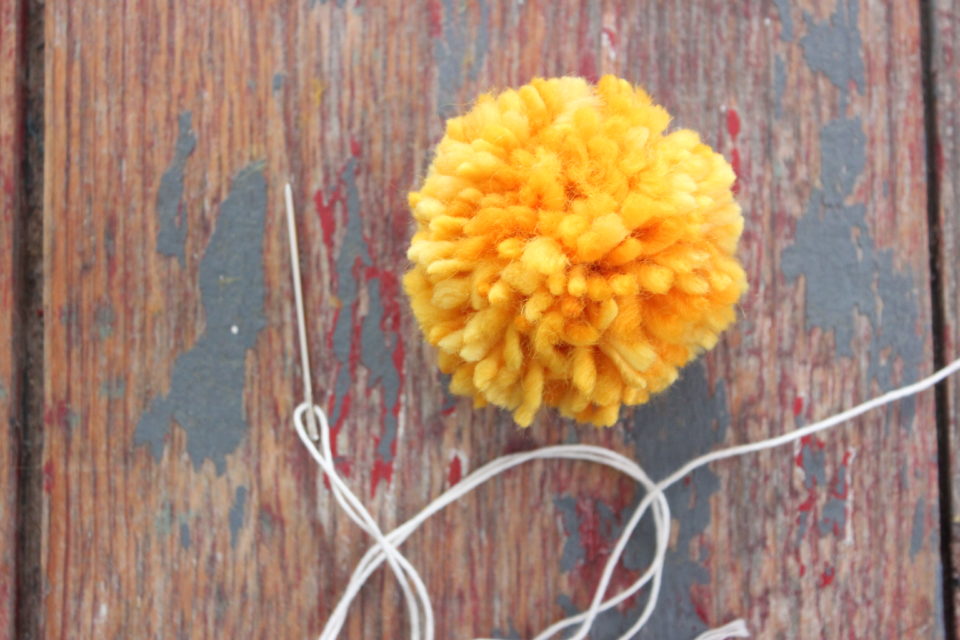
Again, I used my warp thread to string my garland on.  I used a needle to string the pompoms together.  You need to find the center of the pompom, where you wrapped the other string around, because you have to thread the string through there or your pompom won’t stay on!

After you have your pompom threaded on, it’s just a matter of repeating as many times as you want pompoms!

I spaced my pompoms out for the tree.  This year’s tree was too big and too round to make a solid garland for.  So, I just added more warp thread and the knots are small enough that the pompoms will slide over them.

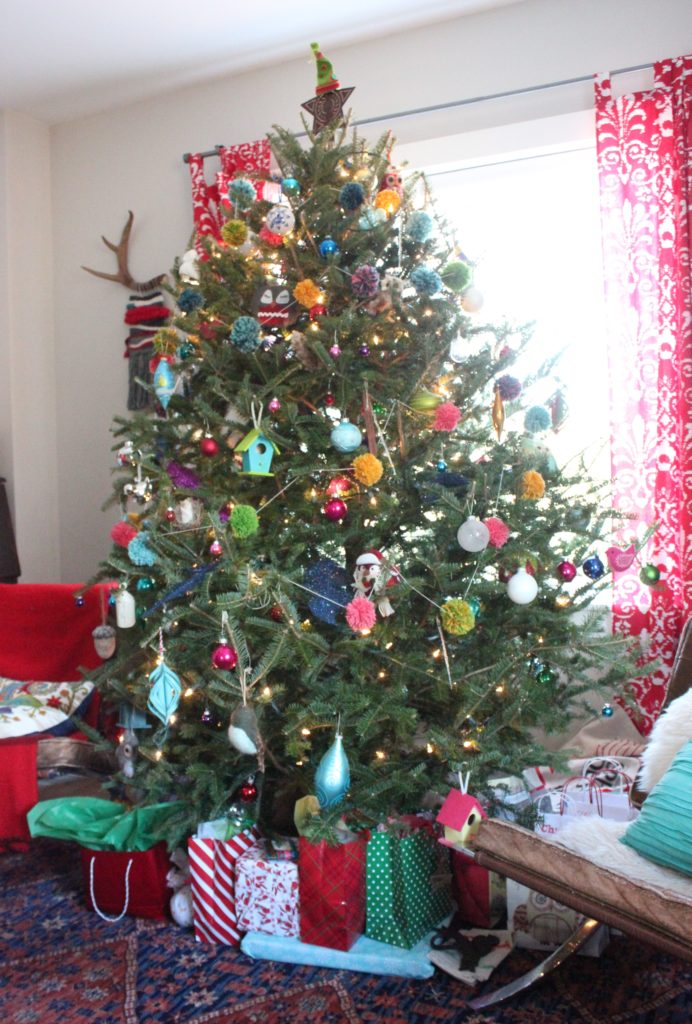
And after Christmas, I still wanted to see my pretty garland, so I slide them together and hung them in the hallway!  Now I can see them all the time and I will say, they make me pretty happy!

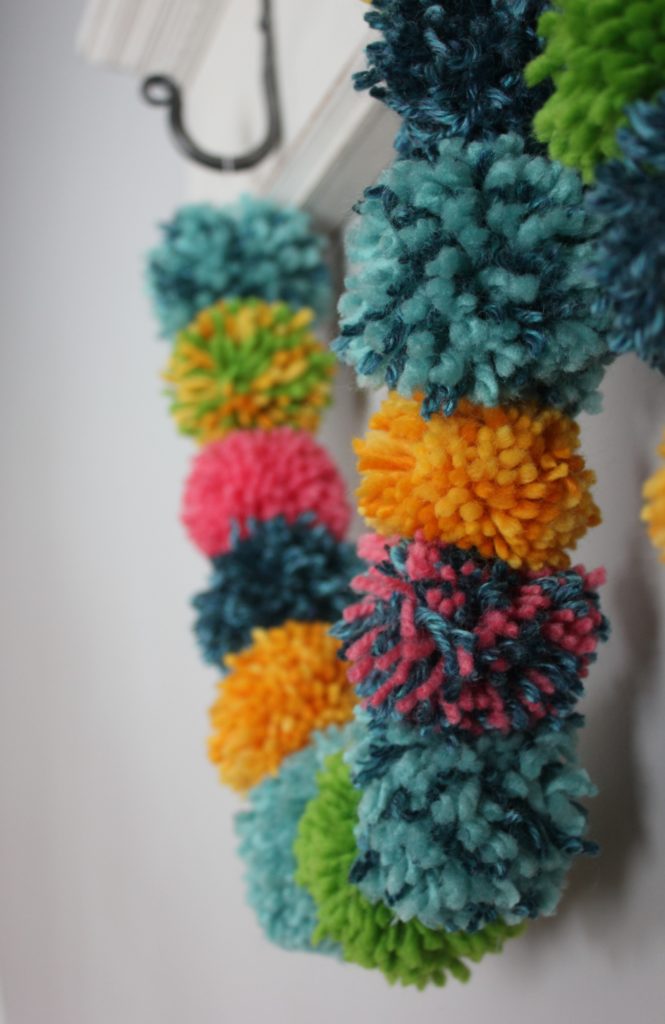
Now, I love colour, it’s no secret.  But this would be equally as gorgeous in a fluffy cream yarn, too!  All colour, or no colour, it’s a fun, easy way to decorate your tree or your home!

Colourfully yours,

Lori


3 In Blogging/ Decorating

Word of the Year – 2019 Edition

Each year for the past few, I’ve picked a word to ponder throughout the calendar year.  Have you done this?  Have you even heard of this? I enjoy hearing what words people pick and how they let it guide their focus.  

Last year my word was MORE.  I made a list of things I wanted MORE of and counteracted them with LESS of something else.  You can read that post HERE.  There are somethings I think I did quite well on and others that were a complete fail but that’s how it goes sometimes.  For example, I did zero Yoga.  Zero.  And turns out, I was ok with that.

But, anyway, enough about last year…onto this year!!  I was debating between a few words and honestly, I hadn’t really thought too much about it until that random gap between Christmas and New Year’s.  And none of the words I was thinking about really seemed like IT…you know what I mean?  Until it hit me. Colour.  COLOUR!!!  I love colour, it made the blog byline for crying out loud!!!  I knew it was my word.  The pieces and plans all seemed to come together with the quickening of my heartbeat.  I was so excited.

So, what does COLOUR mean for me in 2019?  It means if given the choice, it is always going to be the more colourful option.  In my home, in my wardrobe and I’ll squeeze it into my work as much as possible.  { Not everyone loves colour as much as me and as a designer, I need to respect that. }  I want to immerse myself in colour.  The study of colour, the use of colour, the JOY of colour!  Colour makes me happy.

I thought I might start a monthly Colour series on my blog, too.  Each month I’ll pick a colour and look at the pyschology of that particular colour and how I use that colour in our home.  I’ll tell you my favourite go-to colour names in that particular colour for walls and furniture.  I want to share more design/decor type things on the blog and that seems like a very logical way to do.  Maybe it’ll lead to more posts and shared knowledge, too, who knows!

When working in the studio, it needs to be about the use of colour, playing with combinations of colour, exploring colour.  I’ll still be doing the usual creating and painting of furniture and such, but also I want to try some other things with colour, too.  The photo in this post is the perfect example of that.  I found a few sheets of water colour paper and dug out some stamp pad refills and did some playing.  It was fun and messy.  My hands are colourful and I hope throughout the year, they are quite often colourful.  My weavings will be very colourful, too.  I can’t wait to create more with this focus in 2019.  Although….I think I already do this, given my love for colour anyway.

I want to pay more attention to the colours around me, too.  Whether it is in nature, in art, in homes, I want to have a new appreciation for colour.  And I plan on sharing that more on Instagram, too.  I need to think of a good hashtag for it…then you guys can play along, too!

Do you have a Word of the Year?  I’ve been chatting with people about this and I love hearing they why behind the choice.  My friend, Kyla, wrote about her word Bridge and I think you really should go read it! Refresh, Consistency, Build, Home, Simplify, Present, Example, Grow – so many great ideas to go into 2019 with!!  If you have a Word, please share it with us, we want to know!!

To be continued,

Lori

PS I am Canadian, so yes it is Colour and not Color for me 😉