Browsing Category

Makeover

3 In Clear Day Farm/ Makeover

Clear Day Kitchen Refresher

Some people get the seven-year itch, I think I get the three-year itch!  Three years in our ‘new’ house and I want to repaint things I’ve already painted.  The kitchen was on my radar this go-round…

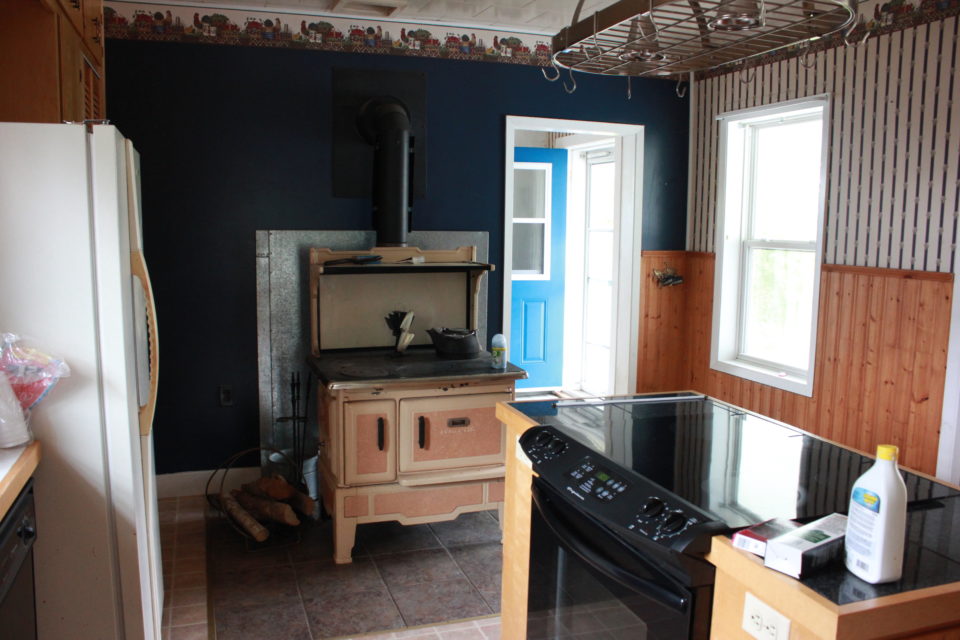
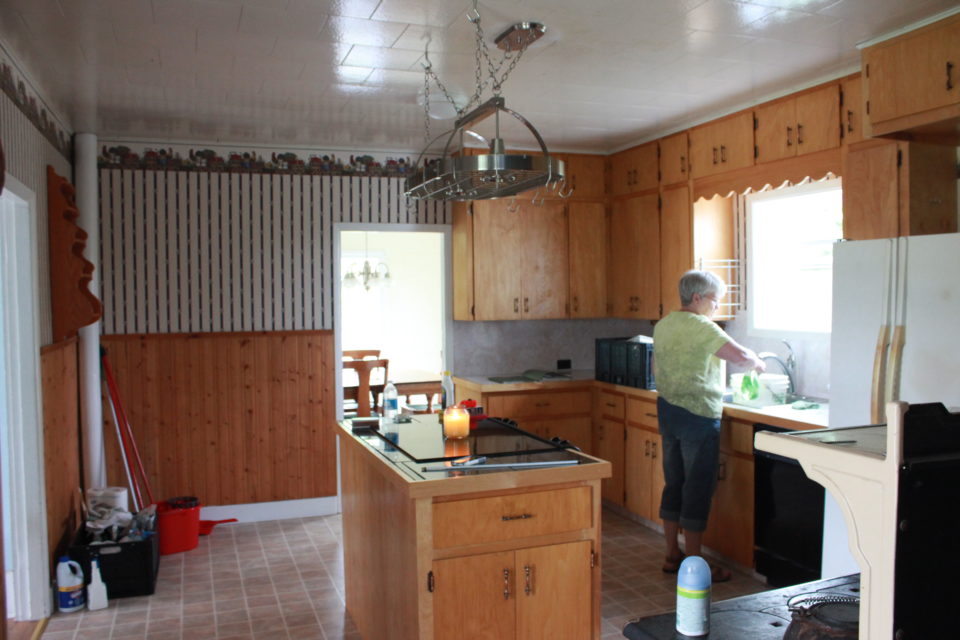
Let’s look back to remember what it looked like when we moved it – because you can’t appreciate how far it’s come without seeing where it was!  Dark walls, loads of wood, glossy yellow ceilings, and dated wallpaper.

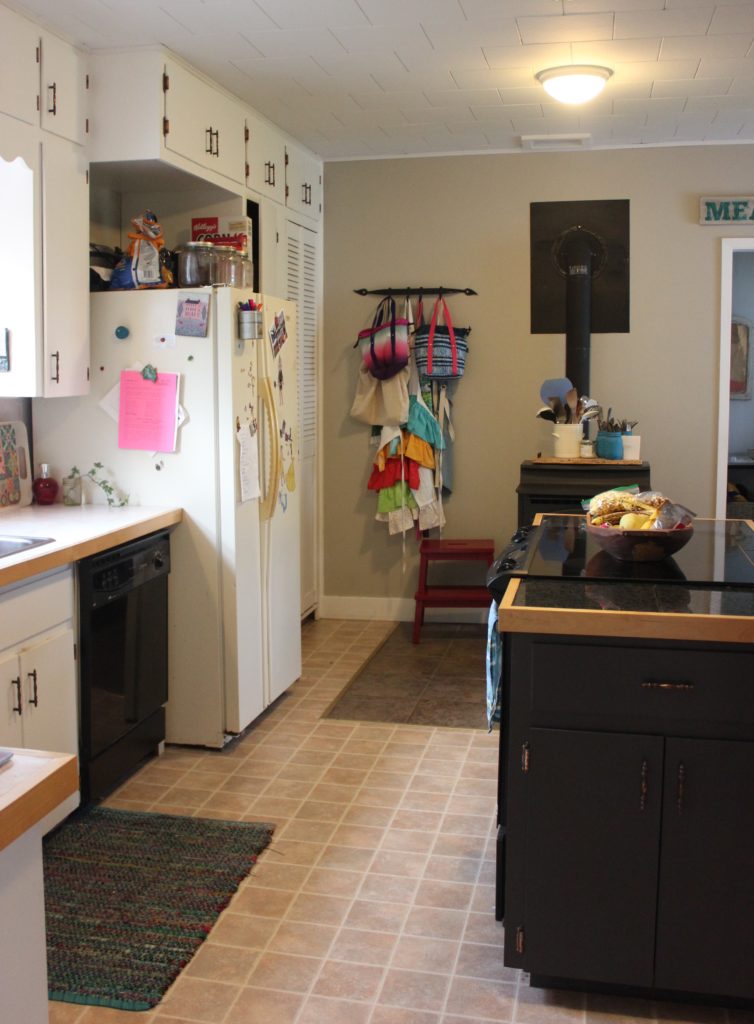
White cabinets and a grey island is where we landed back then and they were fine.  But I was craving something a little more!  When Canadian Tire approached me about their new paint line called Premier, I knew that the kitchen would be what got the make over!

Our kitchen is, like most maritime homes, the hub of it all.  I spend a lot of time in there while I’m home, getting meals made and lunches packed.  So, not only does it get a lot of use, I want it to be inviting and look good, too.  And honestly, it’s the lower cabinets that get all the spills, hard bumps – you know – the messy stuff.  Here’s a few pictures of where we were starting from for this makeover…much brighter even then when we first moved in, but, I still had another vision.

When Canadian Tire sent me my painting kit, they included a fan deck, which if you know me at all, is better than candy!  I love flipping through a fan deck, looking at the different tones and shades and dreaming about all the projects I would want to take on…give me all the colours!!  And, being a Canadian company, the names really struck me.  I could re-do a house purely by selecting the colours based on the names!  I think if they picks names that make you want to get out to explore your country more, they’ve done something right!

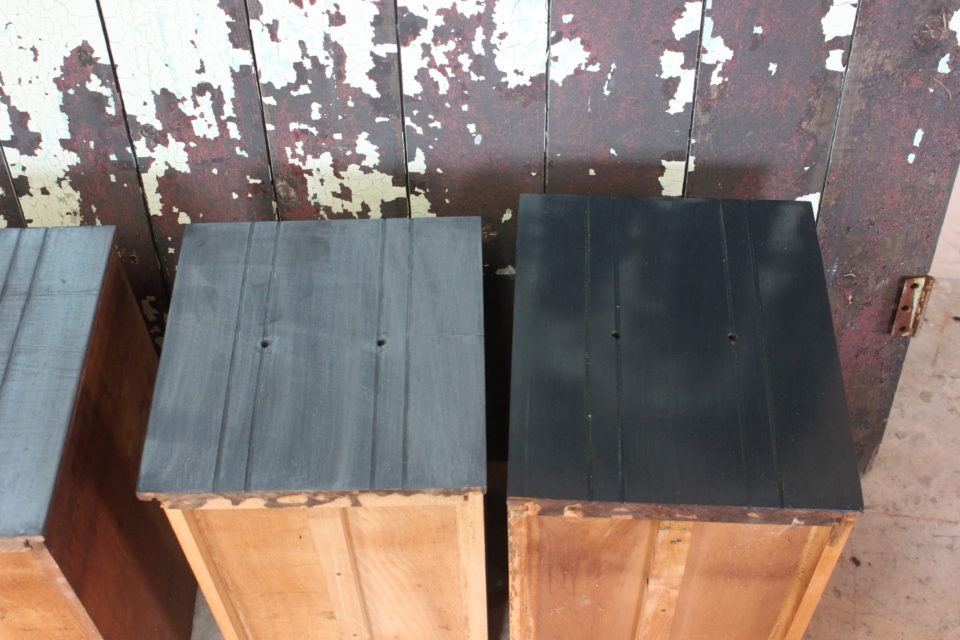
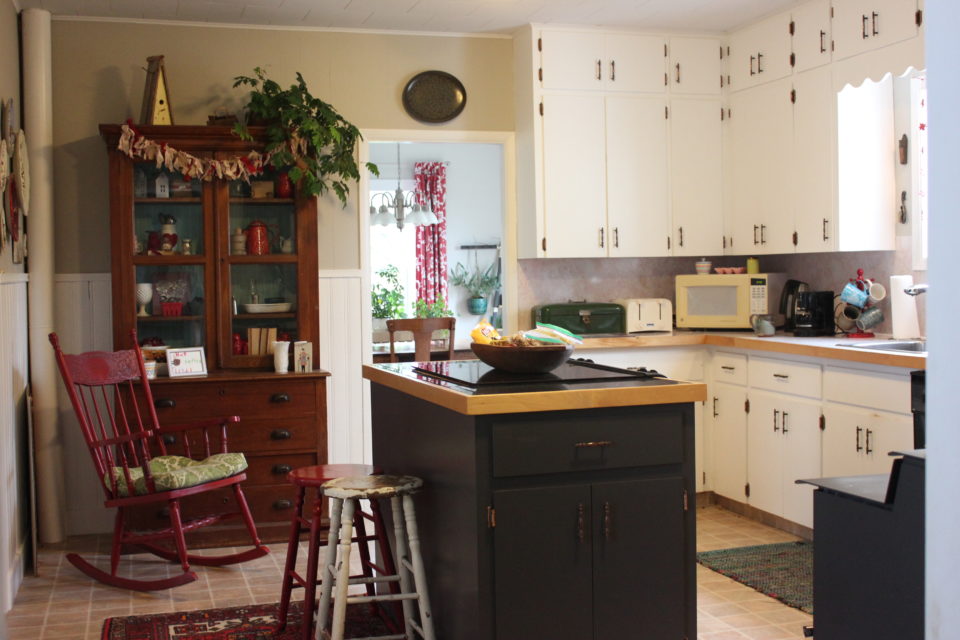
The colours I selected for this project were Paper Birch and Huckleberry.  I needed my colours to work with the griege colour on the walls and the tones in the flooring and I knew I wanted a rich, deep colour for the island.  I also knew I wanted to do something about the hardware, but right now it doens’t make sense to replace it until we REALLY do the kitchen over.  So for now, it was time to get painting.

Off came the doors and hardware and everything got scrubbed down and then the magic started.  There is something so satisfying about rolling on a thick, lovely layer of paint and transforming something.  I find that to be so fulfilling.  I admit that I’m a bit of a paint snob and tend to ensure that I use good quality paints for my projects.  I think that stems from using crappy paint as a kid, painting the all the white trim and fence posts around the farm with whatever the local feed and farm supply store sold.  I want paint that covers well in the first coat, I always do the second coat but if it takes more than two coats to cover, I’m not impressed and the Infinity line from Premier did not disappoint.  Here’s a quick during photo…including Hannah making breakfast!

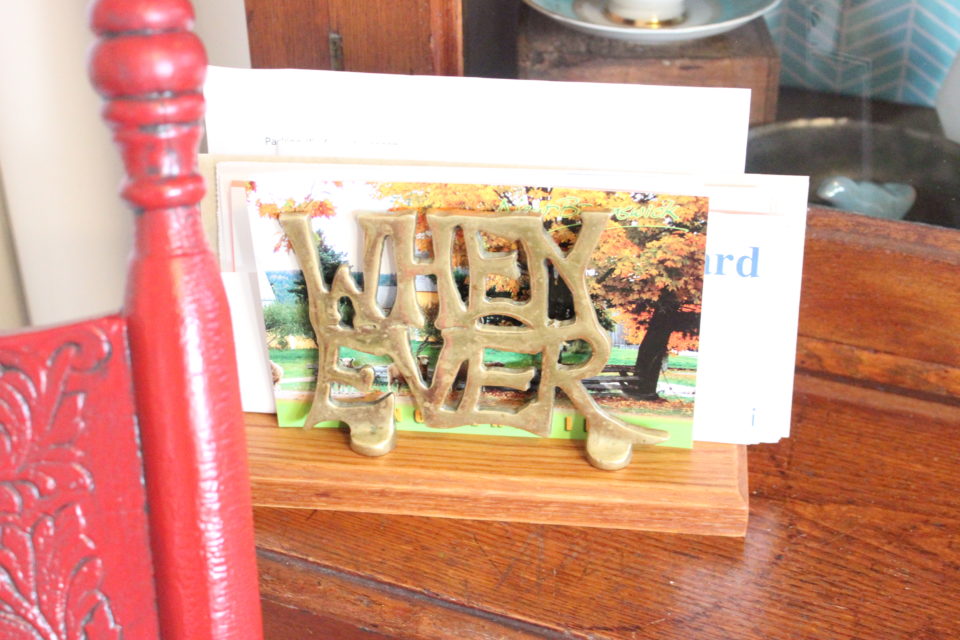
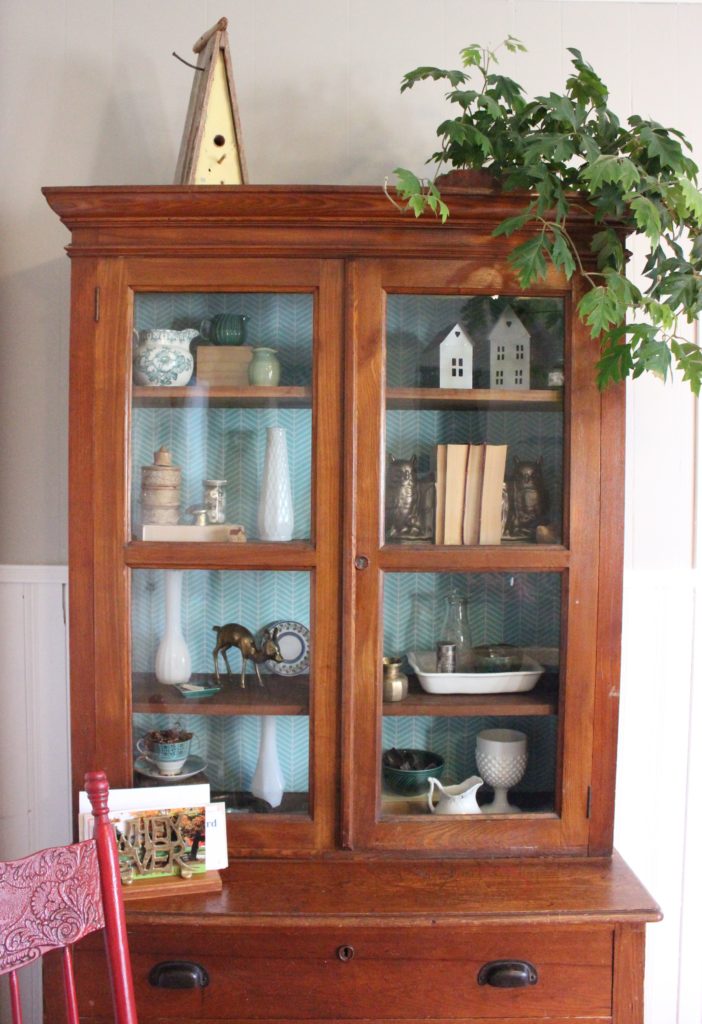
I pulled all the red out of the china cabinet while the paint dried and pulled in more layers of brass and warm gold tones.  We even took a trip to Value Village to see what treasures I could find to add into the mix.  Check out the ‘Whenever’ bill holder!  It cracks me up and it’s perfect to hold the papers that need to be addressed and not filed away quite yet.

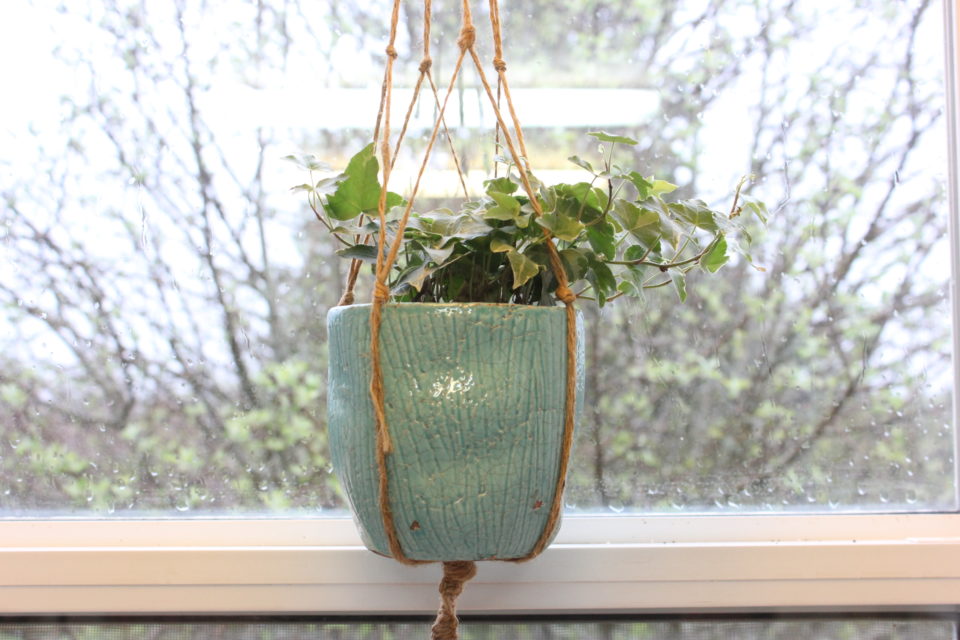
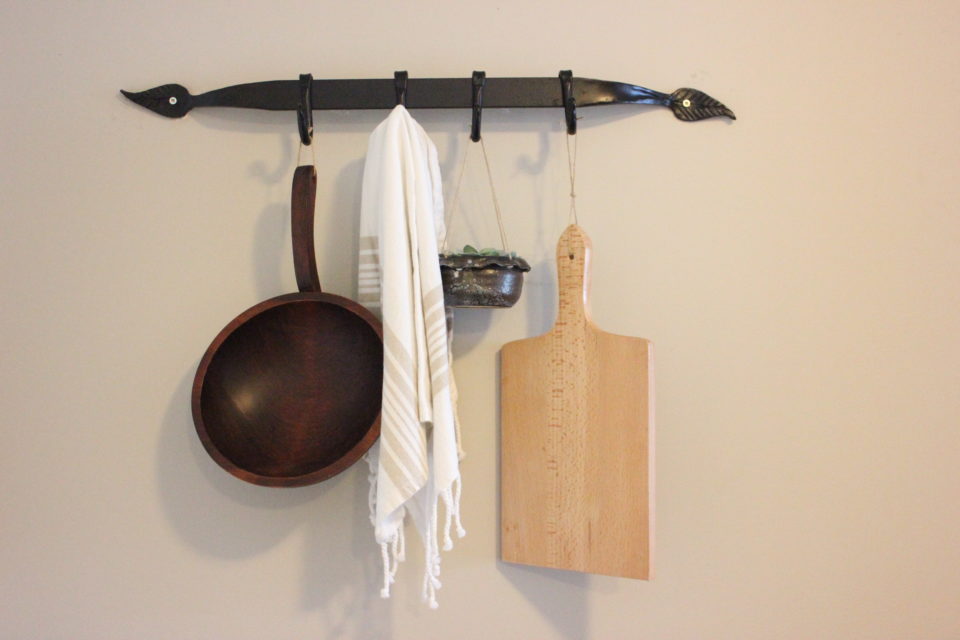
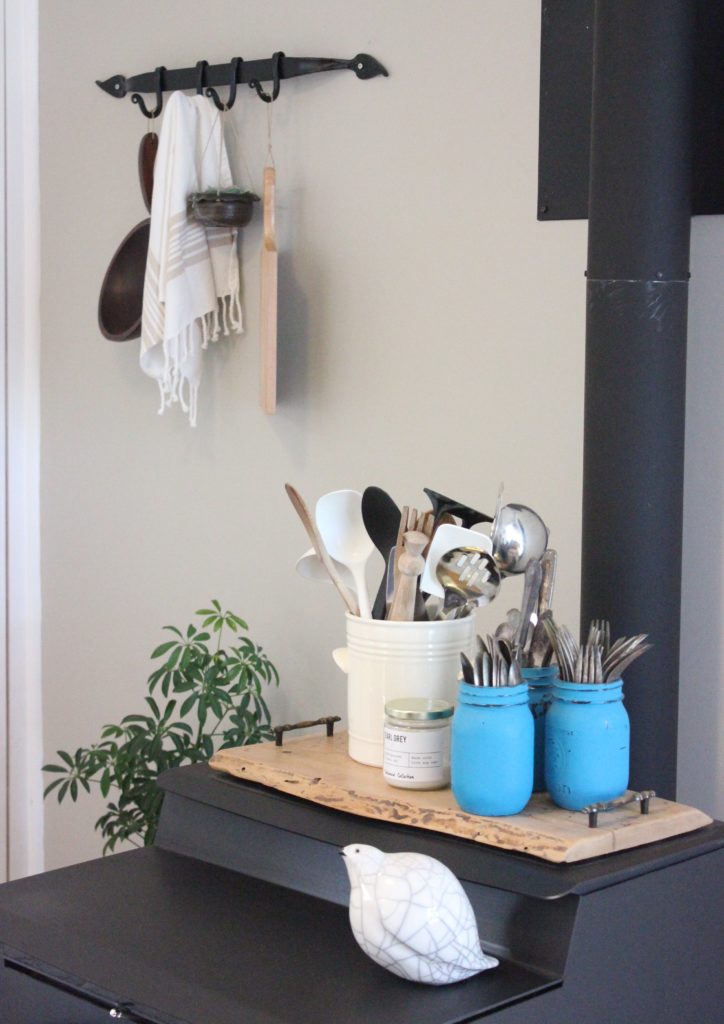
I also scored some cool wooden accents to add to the hooks by the stove.  I had all my aprons hanging there but they looked sloppy and I knew I wanted to freshen that area up, too.  I brought out my little pottery plant pot with my fake succulent { the only kind that I can keep alive } and hung up the wooden cutting board and little wooden pot along with a clean tea towel and I’m loving the look!

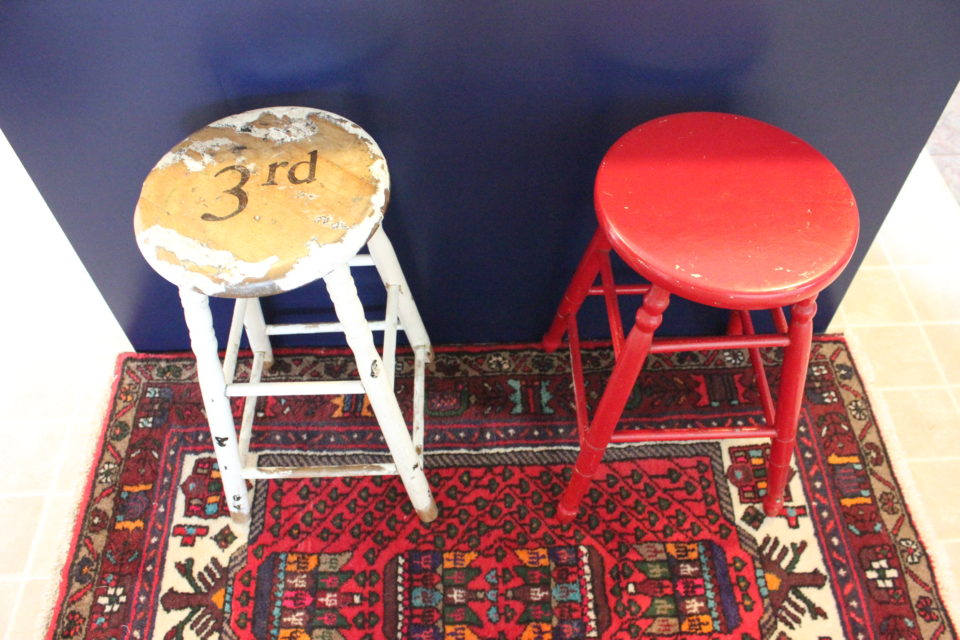
Now, I have a confession to make.  I took down the doors and pulled off the hardware and misplaced 4 of the screws for the handles.  I searched high and low for those screws.  I put everything else back together and had to not stress about the two handle-less doors.  I knew the screws would show up at some point….I put them somewhere safe after all, I’m sure you can relate!  So, here is my kitchen…short a handle or two…

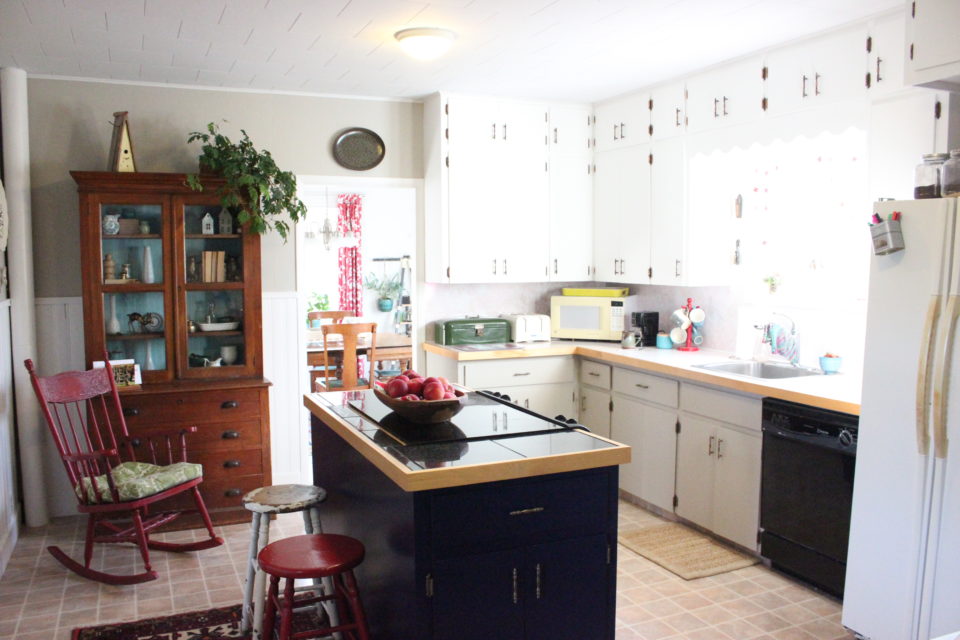
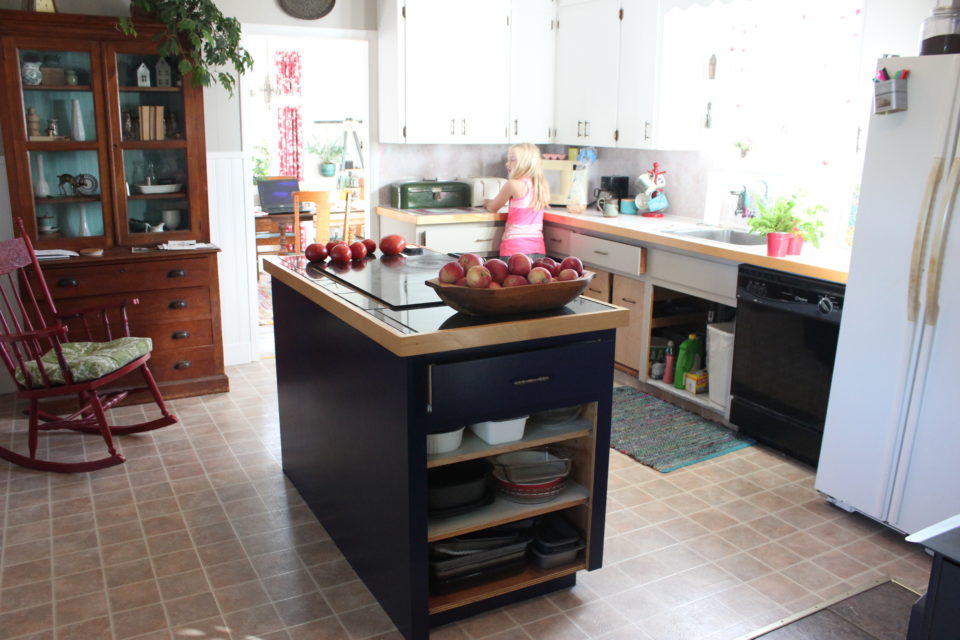
I love how much richer the cupboards feel!  And spray painting the hardware was so easy and lightened it up so it isn’t as busy and so much richer!! I mean, come on – check out this gorgeous island!!!

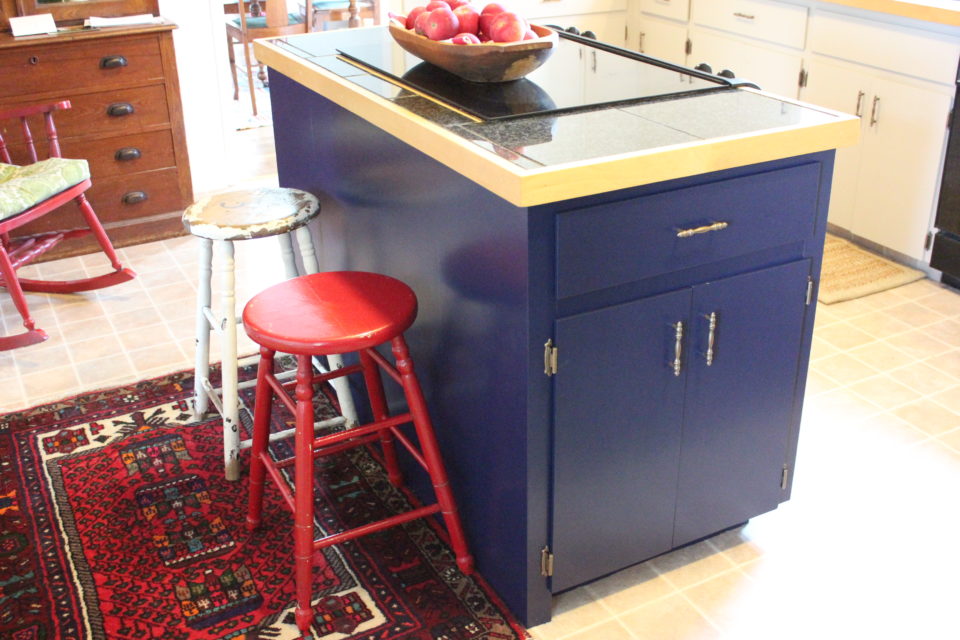
And one final glimpse – the china cabinet and it’s current look!  I can easily add some fall colours to it when I’m ready but until then – I’m loving it!

I’m really pleased with how far the kitchen has come.  Now, I have a long list of other things I would love to change and will get around to doing but for now, this was the refresh that I was craving for the kitchen!  Do you find that when fall hits you are craving to make some changes around your house??

To be continued,

Lori

This post and makeover was sponsored by Canadian Tire but my take on their products is just that!


In Country Life/ Decorating/ Makeover

Home Tour – Airstream Edition

I’m so excited for this tour!  It’s a little unusual but so fun, at the same time!  I mean, how often do you get to tour an Airstream?

This is a tour of an Airstream, yes, but there’s a little more going on.  It’s about connecting with our community and reaching out to strangers.  It’s about going out of our comfort zones and making a new friend as we stood in that Airstream, talking about it, about our families and our lives.  I’m so thankful for the opportunities that having this blog has given me and the new friendships that have developed because of it.  Otherwise, would I have gotten to know Sarah? Who knows! But I’m glad I did!

You see, I didn’t know Sarah, even though she doesn’t live that far from me and our kids go to the same school.  I never met her until one day a couple of years ago when she was picking up her son from the after school program when I was filling in for the regular leader.  I introduced myself but she knew who I was, she follows Farm Fresh.  { That still, to this day, blows my mind, that people know me through this! } So, we would exchange small talk in the halls at school if our paths crossed.  We became FB friends and that’s when I got to see her creative side and that we had something in common – our love for vintage!

When she shared some pictures of her Airstream trailers on FB, I knew I had to ask to do a tour and she was game!  We finally found a time that worked well for both us and we met at her place on a rainy day…so no pictures of the outside!  We chatted while I photographed and then we moved to the rec room above the garage for a cup of coffee and talked for another hour or so.

This Airstream is a 1966 Overland model and they’ve re-done parts of it to make it fresh and safe!  There’s just something about that retro styling that speaks to me!  I love it!  I wish I had one in my yard to re-do, too…except for maybe all the polishing on the outside…

Anyway – here we go with the tour!!!

It’s so cozy and inviting!  I love the little details throughout the trailer.  It’s these little touches that add warmth and personality and make it feel more like home away from home.

This little lion piggy bank was found in a property they owned when they were doing some renos.  It even has old coins in it:

Airstreams are pretty neat and have such retro styling to them, you know when you see one coming!  I love that Sarah is working hard to preserve these amazing pieces of history and keep them alive and well so we can have a glimpse into them…right down to the Airstream towels!

A special thanks to Sarah for letting my come over on a rare day off and photograph this trailer.  It’s fun to offer house tours and make new friends while I’m at it!

To be continued,

Lori


8 In Makeover

Nautical Thrift Store Makeover

A quick and fun makeover to suit the cottage, coastal house or casual decorator from a thrift store score. 

When you find a versatile little table for dirt cheap at a local thrift store, you nab it and think of a plan later.  Especially when you know you have a market coming up!  It also seemed like a fun, easy piece to do over for the Furniture Hop with the East Coast Bloggers crew { Be sure to check out all the other links at the end of this post! }

So, then I needed a plan. Because of the way this table comes apart, it makes for doing the legs a different colour than the main parts.  And I had this anchor stencil which is fun and appropriate since I live in rural Nova Scotia, pretty close to the shore.  Logically, the colour palette would be blue and white…so I ran with it!

Because I always am fielding questions about Miss Mustard Milk Paint, I thought I would use it, too, and maybe explain why I love it some much!  When I decided on the blue and white, I knew that Farmhouse White was a given but I didn’t want the blue to be as deep as Artissimo but I didn’t have enough Flow Blue to do it, so I did what I quite often end up doing….making a special mix.  If I had to guess, I’d say it’s 2 parts Artissimo to 1 part Flow Blue and 1 part Farmhouse White….but, like I said, that’s a guess.  And for me, that’s part of why I love the Milk Paint, it’s easy to customize your colour.  Although I do recommend that you mix enough to do the complete job { especially if you mix the way that I do…a little of this and same of that and bit of this thrown in for good measure! }  I added the bonding agent to the mixture because the surface I was painting already had a finish on it and I didn’t want it to be chippy.

For me, I love the process of mixing up my paint from the powder.  I like the control I have over thickness, colour, and the bonding to the furniture.  I have so much control with Milk Paint!  Plus, it’s very forgiving, so I almost always turn to my Milk Paint for these types of projects.

Okay – I like to keep it real and tell you how things really went down. I messed up the stencilling.  I know better than to try to use Milk Paint for a stencil but I thought I’d make it work THIS time….and of course, I didn’t, as you can see in the above photo.  When you use too much paint or paint that is too runny, it bleeds under the edge of the stencil and you don’t get a crisp line.  And my paint was too runny and it bled under and made it look like crap.  So, I got a wet cloth and wiped it all off.  While the top dried out again, I started trying to mix a similar colour with the acrylic paint I had on hand.  And I think I did alright. 😉

Stencilling attempt No.2 was far more succesful.  Thankfully!  When it was all dry, I sanded everything down and gave it a bit of distressing.  I really like how the stencil turned out, with the white showing through and looking all pretty.  I couldn’t decide how to finish it – would I wax it? Hemp Oil? Tough Coat?  In the end I sprayed it with a clear acrylic sealer because I thought if someone was buying this and taking it to a cottage, they would want a low maintenance finish.

Here it is, looking very crisp and nautical. I’m thrilled with how this plain, boring run-of-the-mill table is now a colourful, special little piece.  I styled it with some recent beach finds – seemed to fit 😉

I hope you enjoyed this transformation as much as I enjoyed working on it in my studio!  Be sure to check out the other furniture flips by my fellow bloggers!

To be continued,

Lori

18 In Clear Day Farm/ Makeover

One Room Challenge – The Studio – Week 6

Here we are – at the end a 6 week journey in the One Room Challenge.  I know you’re anxious to see what the studio looks like now.  And I’m so excited to show you!  It’s so fabulous!  I can’t wait to create in here! But, first, let’s have a quick glimpse of where we started, shall we?

Here’s the past posts, if you are just popping by for your first visit or you really want to see how bad it was!  I cringed looking back at some of these!  How did I even function in there?!?!

Week One / Week Two / Week Three / Week Four / Week Five

Emptying out the space made the biggest difference, I forgot what I had there in terms of space and resources.  It was like a refresh course of all things Farm Fresh Studio.  Then when things got serious and the hardcore painting started, my vision really started coming to life.  White washing the walls, painting out the trim and doors really lightened the space up and made it brighter and softer.  Then the floor, well, that just changed it all again.  I didn’t realize how much of a downer the concrete floor was.  But, paint me a Pacific Ocean Blue floor with some lovely Benjamin Moore Porch & Floor paint, well, I was doing the happy dance after that.  It really made the space feel more deliberate, more intentional and like a real studio space, instead of a room attached to a garage.  Even Michael is really pleased with the painted floor, and he thinks I paint EVERYTHING!! 😉  { He isn’t wrong on that… }

In the above picture, you can see that the new lights made it up before the reveal, too!  I spray painted them and my father-in-law installed them for me while I was at work one day. 🙂 Pretty good for some spray paint and a new socket, eh?

I’m loving the new look the desk is sporting!!  And, I tried lots of chairs here and finally settled on this one.  A few options just wouldn’t slide in and that’s just a royal pain.  Some felt too causal, like the one I had originally planned on using, for this lovely, rich-looking desk.  So I dipped into my stash and tried a few out and settled on this chippy yellow chair.  And I still love my sewing machine cover made from Michael’s grandmother’s quilt-top we found! 🙂

The farm auction chair looks great in here with its white legs and freshly scrubbed fabric – because one never knows, especially if you bought it in a lot with a random shop vac…at a farm auction!  I like that it works colour-wise in here without needing a re-do! Also, it’s light and easy to move if I need to stage a picture in front of the wall.

When it come to putting things back into the space and making it look good, plus function better, that’s when it was really fun!  I have so much neat stuff that was just buried under all the crap I had collected and stashed!!  But now it’ll get to shine on again.   I was excited to get to do a gallery wall in here, I love gallery walls, especially ones filled with treasures and creations that mean something to mean.  But I guess that’s whole point, right?

The corner cabinet got a coat of a special mix of Miss Mustard Seed Milk Paint and then a quick sand followed by a coat of hemp oil.  Then I screwed it to the wall and ta-da!!  New display and storage handy my work table which is strangely empty.  I quite like my shelf, I’m glad I bought it for $5 all those years ago!!

Here’s a few little close-ups of some treasures that have found their way back into the studio.  I love a few special vingettes throughout the studio – great for inspiration!!

I’m not sure how long this poor little ivy will last, maybe the summer but it’ll probably have to move into the house come winter. The plant pot is one of the treasures I scored earlier this week at our new Value Village which you can read about HERE.

We aren’t even going to look at my To-do list because I crossed every single thing off – even the ones I added on along the way!  Feels pretty good to have accomplished all that hard work over the course of 6 weeks.

Well, thanks for tagging along as I gave my studio a make-over.  I hope you enjoyed the transformation!!  It’s been fun being able to really focus on my own space and make it work better for me and look better, too.  It feels so amazingly different!!

To be continued,

Lori

If you’d like to see some other great reveals, click the logo below!

Special thanks to Benjamin Moore for supplying me with the paint for the floor!  The opinions expressed in this post are solely mine.

6 In Makeover

One Room Challenge – The Studio – Week 5

Guys!!!  Big progress to show this week!!  I’m so excited for you to see!  I can’t even tell you what a difference there is in the studio now.  Like HUGE!!!  It just goes to show that a coat of paint can make a difference and impact the overall feel of a space.

But let me slow down and back up….in case you haven’t been following along.  This is Week 5 of the One Room Challenge which means we are almost done, I have mixed feelings about that, I’ll admit.  I’ve enjoyed being a part of this, working on a space that I love so much.  But I’ll be happy to get back to using the space and not having a huge To-Do list hanging over my head. Here’s the review if you’d like to look back over that past weeks, just click on the week you’d like to see.

Week One

Week Two

Week Three

Week Four

So, this week’s progress was even more painting but this time is was easy and dreamy!! I had a coat of paint on the floor in less than an hour!  Not including the prep work, of course, which was washing down the floor with a special cleaner.  Because the floor gets hard use – we’re talking mud, paint, manure, rocks, water – I knew it needed a deep cleaning so I did it twice and then rinsed it very well and let it dry.  When it was dry, I cut in and and then rolled the rest while listeing to a Vinyl Cafe podcast about Christmas….yes, in April!  Even before it was dry, I was smitten.  Guys, G-A-M-E-C-H-A-N-G-E-R.  This floor paint makes it feel like a real space.  A space that we really care about, and you know I do!

The next morning, I put on my slippers and put a second coat on.  I’m not the only one who does these things in my pyjamas and slippers, right?   Here’s a shot that shows how wonderful a colour Pacific Ocean Blue by Benjamin Moore is. I’m afraid that everything might be this colour before too long!  There’s a patch of floor in our entry that is painted grey…for now… 😉 #nothingissafe  I LOVE it paired with the red curtains!


I was fortunate enough to have received this paint from Benjamin Moore for this project.  I’ve sold Benjamin Moore in the past and still work with their colour palette on about 99% of the decorating projects I’ve ever worked on in my 17-year-and-counting career as a decorator.  { FYI – the 1% is when the client insists on using a different brand, why, I’m not sure!! }  Arrangements made with the local rep who I’ve had the pleasure of knowing for all those 17 years, I picked up paint at the local Benjamin Moore dealer in Truro, Chase’s Colour Centre and they were so lovely!  They were a little curious about what it was exactly that I was doing but I was in again since then for something unrelated and I gave them an update and showed some pictures of the progress.  What a great crew, I highly recommend them!

The other progress I made this week was all done before I started the floor because I knew I wanted to give it lots of time to dry before I started dragging furniture back in.  And then I knew time would be up for this One Room Challenge and I want to finish on time! So, I finished off a few of those pesky other projects that were lingering.  I put the final coat of white on the doors.  I hemp oiled the desk – here’s a little sneak peek of that:

And I framed the chalkboard!  I’m so pleased with myself over this one – I have no training in woodworking and I fear for my digits but I’m learning, little by little.  Granted, this is a pretty basic project but I had to decide how I wanted it framed.  My big requirement was that it needed to have a ledge.  I was tired of having to search for the chalk every time I wanted to scribble a list or reminder.  So I bought the boards, cut them to length and then, you guessed it, painted them!  The frame I did in a wash of Miss Mustard Seed’s Curio and Throphy and then a coat of hemp oil.  Once they were dry, I pre-drilled my holes and nailed it to the wall.  And I love it! I’m so glad I added that project to my list – it was satisfying in so many ways!  You can see it in the first photo – it’s contrasts nicely from the wall.

As always, my To-Do list is growing, changing…I guess that’s the nature of these projects!  I finished the chair and I don’t like it with the desk so now I’m going to use a chair from my bedroom, which used to be at our table in the last house.  And I’ve decided to change the lighting.  Let’s look at the list and then we’ll talk about those lights, shall we?

Sew the curtains for the prep table – done

White wash the walls – done

Paint the floor – done

Frame the chalkboard – done

Paint the sewing desk – done

Paint and hang the corner cabinet – done

Paint the doors – done

Paint the sewing chair – nevermind, not using this chair anymore anyway!

Paint the trim  – done

Switch out the lighting – hoping to have done for the reveal….

So the deal with the lights is that I was admiring my lovely walls and floor and the ugly bare bulb lights really stood out to me.  I chatted with a couple freinds and got their opinion about the lighting and the fact I have two different types of lights within the 12′ by 24′ space.  But, given that this is my studio and I do work in here, I need good lighting.  Granted, when I’m in here during the day, I rarely even have the lights on.  My last trip to Cape Breton, Janice had changed a couple lights in her house and I really liked them, so I thought about buying them.  And then a light bulb went on – pun intended – and I remembered that in my stash I had old schoolhouse style lights!!  So I took a run down to the farm to retrieve them and see what would be required to get them re-wired and installed – which basically meant I asked my father-in-law to help me!  The plan is to switch the sockets and then figure out if they can be tied into a modern box.  The base will need to be, you guessed it, painted!  The globes just need a good wash…years of dust and bird poop will easily clean off those… The added bonus of these is that I have 5 so if this plan works, I can switch out some ugly lights in our house and it should be relatively cheap!

That’s a wrap for this week – you will not want to miss next week because it’ll be Reveal Week when you see the space as a whole!  I can’t wait to start pulling things in { very delibrately, though } and making the space pretty and functional to work in!

To be continued,

Lori

{ Disclaimer: I was given free product for this project by Benjamin Moore but my take on it is just that! }

To see other Week 5 posts from bloggers taking part, click the logo below!