Browsing Category

Make Something

In Make Something

Cream Puffs Say I love You

Cream Puff is a term of endearment, right? Okay, that might be a stretch, but they certainly say I love You!  And since it’s Valentine’s Day, they’re the perfect treat to make your special Valentine!

I have loved eclairs and cream puffs all my life.  But, I never had attempted to make them until now – I figured they were way to complicated and hard to make.  I’ll admit it, I was wrong!  They are surprisingly simple to make.  And tasty to eat….

Everyone who worries about eating raw eggs, ignore the next sentence, it isn’t for you.  All you who enjoy licking the spoon when you bake, I will warn you, you won’t like the taste of this.  I promise, it tastes like glue.  Wait for the filling or topping, it’s worth it.

Here’s the recipe that my friend, Terrie, sent to me when she mentioned she had made Cream Puffs.  I whipped up a batch and we’ve been enjoying them since!!

Cream Puffs

In a saucepan:

Boil 1 cup water

Add 1/2 cup butter

Bring to a boil again

Add 1 cup flour

Mix until it leaves the side of the pan

Remove from heat

Add 4 eggs, one at a time

Beat until smooth

Drop spoonfuls onto cookies sheet

Bake at 375* for 30-40 minutes

Filling:

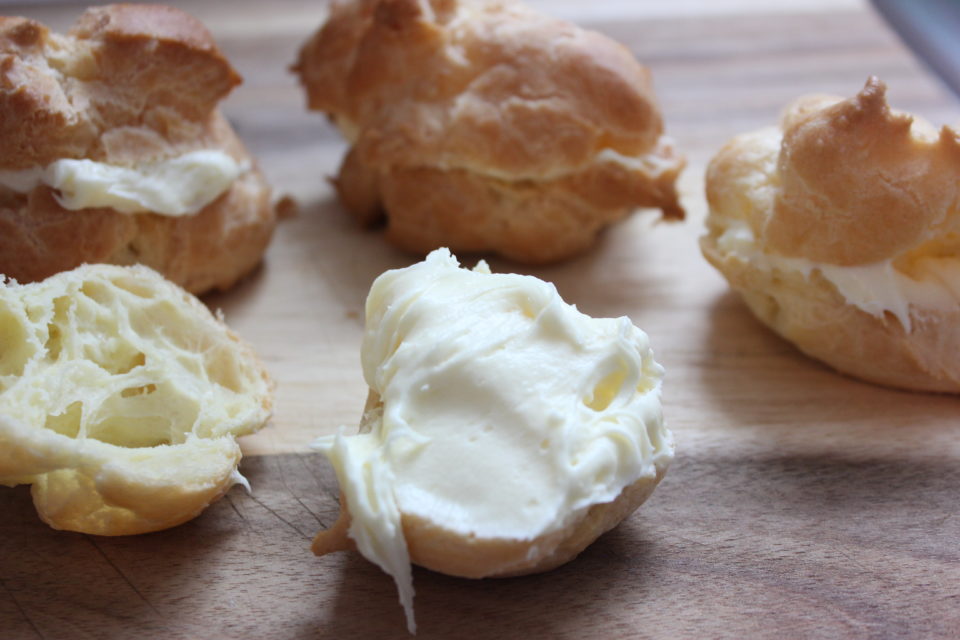
Beat 500ml of whipping cream with 1 package vanilla pudding mix until thick

Topping: 

Mix cocoa with icing sugar and water { I honestly just wing this }

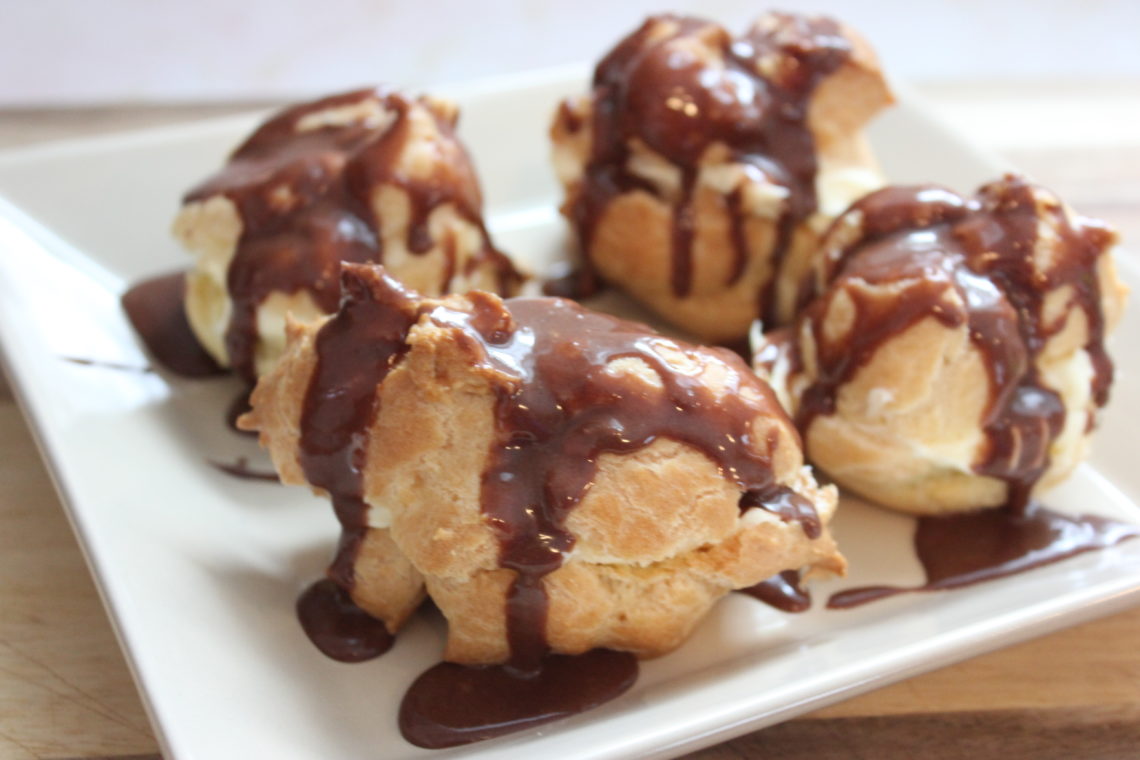
Once cream puffs are cool, cut in half with a sharp knife and spread with filling.  Put the top back on and spread the top with the chocolate icing mixture.  Try to share….

Because I wasn’t serving them all at once, I didn’t fill them until just before we ate them.  I put the cream puffs in a sealed container and tucked the filling in the fridge.  That way they stayed fresh and didn’t get soggy.

This is definitely a recipe I will  make again.  Especially if we have company coming or I need to bring a treat to an event.  They were surprisingly simple to make and make a big impression!

How about you, do you love a good cream puff?

Colourfully yours,

Lori


2 In Make Something

Homemade Christmas Gifts

Ok, this post is really late. Posting about Christmas in January?? But I couldn’t share gifts I was giving before I gifted them, I didn’t want to ruin the surprise!  But since it’s January, I’d say its safe now, right? 

Usually I have one gift a year that I’m really excited about giving.  This year it was a gift for my Dad.  If you’ve been hanging around these parts, you may have picked on my love of barn quilts? No? Well, you can read about it HERE and HERE.  Since Mom and Dad moved, I decided they needed a barn quilt on the garage at their new place.  So I started looking for a design I wanted to use and I chatted with Mom about the colours that she thought might work into their current colour scheme and I strongly recommended a yellow front door and some nice navy shutters….and if that rings a bell, it’s because that’s what we have at our house!  But since their house is green/blue/teal { what colour is that siding anyway??? } it would look very different.

Anyway, I digress. Back to the barn quilt…  I had a rough idea that the pattern couldn’t be overly complicated because I was only doing a 2′ x 2′ barn quilt.  And I found the perfect one.  Guess what it is called??  Farmer’s Daughter!!  Could it be more perfect?? No, I didn’t think so!

Mom had mentioned she was looking for a sign with a certain prayer on it but couldn’t find one that she liked.  So I offered to make her one.  I stenciled the prayer onto my stained sign { with some help from Angela who has a Circut } and then free-handed the wreath around it.  It isn’t perfect and part of me cringes when I see it, but Mom loves it and that’s all that matters, right?  Hannah has adopted this prayer and will sometimes say it at the beginning of meals instead of our regular grace.

This next gift was one I had given to several friends this Christmas.  It’s made from an old barrel stave from the property where we built our first house after we got married.  I’ve been lugging these staves around for years and finally found a good use for them!  With the handsome Mr. Byrne’s spade bit, I drilled holes that I measured out and then I gave it all a sanding.  I decided to finish them with a coat of Miss Mustard Seed’s Hemp Oil and it made the character of the wood really pop.  I did up a little paper bag with the tea light candles, too, so they could be lit right away!  I made one for myself, too.

I wish I had more time to make more gifts each year, but with these gifts featured in this post and some cuffs that I made, too, I think I did alright.  Do you make homemade gifts to give for Christmas or birthdays? I’d love to hear about it!

Colourfully yours,

Lori


3 In Make Something

Weaving a Rainbow

Ever since I took the weaving workshop with House of Woolly Thyme, I’ve been addicted to weaving.  I’m not sure how many weavings I have done since then.  And I’ve even taught weaving to my 4H Craft Projects kids.  So when Mary Anne asked me to help promote her weaving kits, I was all in!  

The kit arrived in all it’s colourful wonder, with everything I needed to complete an entire weaving.  The basic weaving supplies like the warp thread, needles, and even the scissors! The wooden loom included in each kit is so nice to use for weaving.  I have done a few other weaving projects on handmade looms or cardboard looms, but there is no comparison to using one of the House Of Woolly Thyme looms.

There is an instruction manual included that explains each step to completing your weaving so you know exactly what to do.  I love that it follows Mary Anne doing a weaving from start to finish so you can see what a completed weaving looks like and just how achievable they are!  The photography is beautiful and the whole manual very well thought out.

The fibre I selected for my weaving was very colourful.  I want to embrace my Word of the Year, Colour, and this colour palette seemed like the right fit, don’t you think?  The selection of different types of fibre is incredible.  The more variety in textures and fibre, the more dimension and interest your finished weaving will have, too.

I especially love that the kit includes an authentic piece of Nova Scotian driftwood to hang your weaving when it’s completed!  If you follow House of Woolly Thyme on Instagram, you’ll see posts about driftwood collection and you’ll catch a glimpse of some of our amazing Nova Scotia beaches.

When I started my weaving, I debated doing it in perfect rainbow order.  I hummed and huhed while watching Netflix with the girls.  Then I decided to jump right in and go all colour, all over.

And here’s the finished product:

If you want to try weaving, I highly recommend one of these Introductory Weaving Kits.  You can’t go wrong with the quality of the items in the kit.  And the instruction manual will take you step by step through the entire process.  You can see the selection of available kits HERE.

And if you are in need of a more hands-on experience, you can always go to one of Mary Anne’s workshops at the Lunenburg Makery or the Trainyard General Store.  You can read my experience at the workshop I took over a year ago HERE.

I hope you give weaving a try, I find it to be very satisfying and stirs my creative soul.  And, I can do it from the comfort of my comfy couch!

Colourfully yours,

Lori

PS I was supplied the Introductory Weaving Kit by Mary Anne of House of Woolly Thyme but my take on it is just that 😉


2 In Decorating/ Make Something

DIY Pompom Garland

This past Christmas I decided I wanted to add some more colour to our tree.  It wasn’t quite as bright as I had hoped, in part because I didn’t get to make all the decorations I had wanted to.  So I sat down one night while watching Netflix with the handsome Mr. Byrne and started making pompoms for a garland around the tree.

Making pompoms is a fun way to get to own/purchase/shop for yarn.  I word it like that because I love yarn but I don’t knit or crochet so I started making pompoms well before I started weaving.  Now, with weaving, I have a lovely suitcase filled to overflowing of lovely yarns and fibres.  And, the nice thing is, pompoms are super fun and easy to make.  The girls made a bunch around Christmastime, too, they raided my yarn stash plus Hannah has a bunch of her own yarn, too.


The first step is to select your colours.  I used brightly coloured yarn, some was 100% wool and others were acrylic or whatever, and for this project, the content doesn’t matter, more the colours that I wanted.

We have a wooden pompom tool that came in a small loom kit we found on sale at our local Michael’s store.  It makes it very easy to whip up a pompom in no time flat. There are other tools and ways out there you can make pompoms, too, but this was handy and so I though I’d try it out.

You simply wind the yarn around and around the prongs.  The more times you wrap it, the fuller your pompom will be.

The next step is to tie off the middle of your pompom.  I used my warp thread for weaving, it is thin and very strong, so I could pull it tight without worrying about it snapping. I wrapped around the center twice and then knotted it and cut my ends off.  If your pompom is full enough, you won’t see this string.

Then you slide your pompom off the prongs.  You can see I didn’t get my strings perfectly in the center, you may be able to slide the string but I wasn’t overly worried about, once it is gathered against the other pompoms, you won’t even notice it.

Then you grab a pair of sharp scissors and cut your loops.  Dull scissors will only drive you mad, trust me.

Then comes the fun part, fluffing and trimming your pompom.  The left side hasn’t been trimmed yet and the right side had been.  Every once and awhile when I’m trimming, I’ll give it a good shake to fluff it up so I can see where any long sections are.

These fluffy trimmings are just so fun against the iron of this little dish, I just threw it in here because it brings me joy. 🙂

After you are happy with your trimming, you have a pompom!!!

Again, I used my warp thread to string my garland on.  I used a needle to string the pompoms together.  You need to find the center of the pompom, where you wrapped the other string around, because you have to thread the string through there or your pompom won’t stay on!

After you have your pompom threaded on, it’s just a matter of repeating as many times as you want pompoms!

I spaced my pompoms out for the tree.  This year’s tree was too big and too round to make a solid garland for.  So, I just added more warp thread and the knots are small enough that the pompoms will slide over them.

And after Christmas, I still wanted to see my pretty garland, so I slide them together and hung them in the hallway!  Now I can see them all the time and I will say, they make me pretty happy!

Now, I love colour, it’s no secret.  But this would be equally as gorgeous in a fluffy cream yarn, too!  All colour, or no colour, it’s a fun, easy way to decorate your tree or your home!

Colourfully yours,

Lori


2 In Blogging/ Life/ Make Something/ Makeover

Called to be Creative

Creativity runs in my blood. My grandmothers were both makers, my Opa was as well. All in very different ways but in their own right. My mom is creative, too, although she’s probably deny it. My Dad claims that he doesn’t have a creative bone in his body regardless of the fact his mother was an incredible artist.

I mentioned in THIS POST that I had made myself a cuff with the saying on it – ‘called to be creative’.  It was a hashtag that I found and starting using some on Instagram.  But then the more I used it, the more it resonated with me.  I added up putting it on a cuff as a reminder to me to use my gifts.

I grew up being given free rein to a drawer of craft supplies. Later with fabric scraps and mom’s sewing machine. And the scrap wood in the machine shed was fair game, too. I made everything from clothes to forts to wild stories and poems. My access to materials was never denied.

But it was never a conscience thing. It was just how it was at home. All of us kids were always dreaming up something. And I know for my best friend growing up, it was the same. It was nothing for her to sew something up, or make something or other. I never thought a thing of it. It was perfectly normal. The fact that I was one of the very few in my Home Ec class that knew how to thread a sewing machine never occurred to me.

Fast forward to adulthood.  I spend my days creating comfy, inviting homes for my clients.  I love playing with colour.  I geek out over fabric samples.  I dream up combinations of flooring, backsplashes and furniture.  I think in Benjamin Moore colours for walls and Miss Mustard Seed paint colours for furniture.  I love taking something cast-off and turning it into something fabulous.  It’s just how I’m wired, how I am.  I think nothing of it.  It’s my normal.

But.  There’s always a but, right? It took me a long time to see that this is a form of creativity.  I don’t call myself an artist.  I don’t do oil paintings, I can’t whip up a landscape watercolour and I’ve only played with pottery a bit { but I’m aching to get back at it…. } I’m not an artist in the way that society thinks of an artist.  But it doesn’t mean I’m not creative.

These gifts I use in my day-to-day life, pairing colours, fabrics, styles, it is what I am called to do.  I’m called to help people turn a shell, a house into their home.  To talk with them and figure out what will work for them and help them create a space that they feel comfortable in.  And it is my pleasure to do so.  For a while, I felt as though my career as vanity, frivolous, fluff, if you will.  And I think it was because I didn’t realize that just anyone could do what I do.  I didn’t see the value in what I did.  And sadly I worked in this field for a long time before I realized my worth, the value in my skillset and gifts.


I keep referring to my design skills as a gift.  And I believe that.  I firmly believe that I was given this particular set of gifts and I am called to put them to use.  Whether that is out in my studio, setting our own house up or helping someone else transform their space. I think we are each given talents and gifts in this life.  What we do with them is up to us.  But I have found that putting our natural talents to use is far more fulfilling then fighting it.

So, I will continue on my path, using my creative talents in many ways.  In fact, I’ve got a fun project coming up in the next few months that I can’t wait to share with you all but I’ll keep that under wraps for the moment.  It is exciting to see the different ways that these can be exercised – my day job, my studio time, our home, my work with the At Home magazine, my blog, 4-H – so many ways to put these to good use!

It is my hope that you have discovered your talents and gifts.  And that you have found a way to put them to use that is rewarding, satisfying and fulfilling!

Colourfully yours,

Lori

PS The artwork in this post is from my grandmother, Lena, I feel quite honoured to have as much of it as I do!