Browsing Category

Make Something

1 In Make Something

I Heart Barn Board

With Valentine’s Day around the corner and my love of barn board, this project makes me happy.  Plus, it’s always fun to switch up the decor a little from season to season.

When I started chatting with Rose of Phillips and Chestnut about the project for this month, she suggested I do something for Valentine’s Day.  So we brainstormed a little and I picked up some barn board and got to work making a heart out of the old, textured wood.

I love the history and age of barn board.  Our family barn had wood on it and it was so weathered and grayed from being exposed to the elements for over a century.  And even though that barn is still standing, it’s neat to think that the boards I was using for this project had been around for so long, had seen the world change so much and get to continue on in a much different form.

Barn board is such a great way to add texture and character to a space, whether you are just doing a shelf or two, or covering an entire wall with it.  I’ve suggested that to a few clients and I’m so happy they’ve gone through with it.  It’s so nice that we can source an authentic product like the real deal from Phillips and Chestnut.

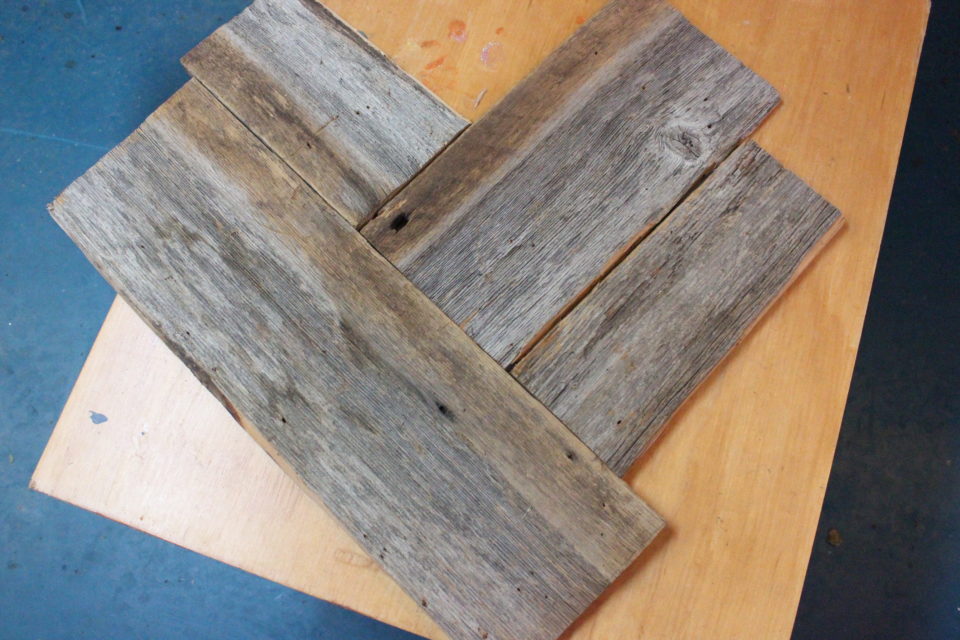
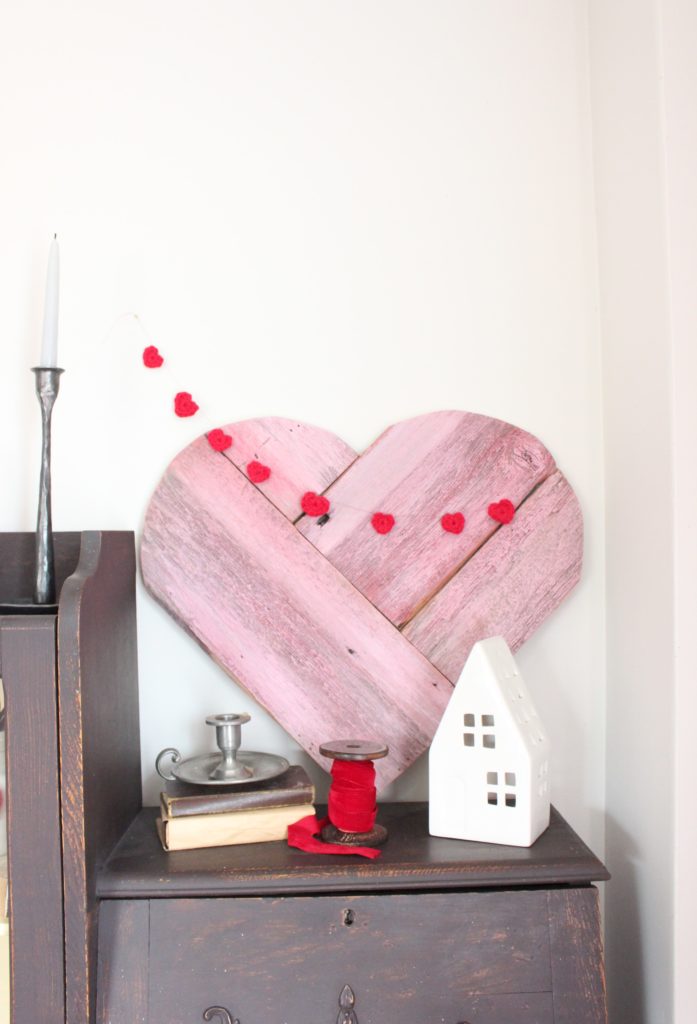
But anyway, we aren’t here to talk about accent walls!  I want to show you what I made with the barn board in the studio!  I knew I wanted the boards to run in different directions and I knew I wanted to showcase some of the fabulous textures, knots, nail holes and the such, that comes on the aged barn board.  I sketched out a large heart on paper, this one is close to 2′ wide.  Then I laid out the wood on my pattern and rough cut the length of board I needed for each piece of the puzzle.  I backed my heart with a small sheet of MDF that I had kicking around the studio.  I glued and nailed the boards to it.  Once the glue was dry, I traced my heart pattern on the boards and cut it out.

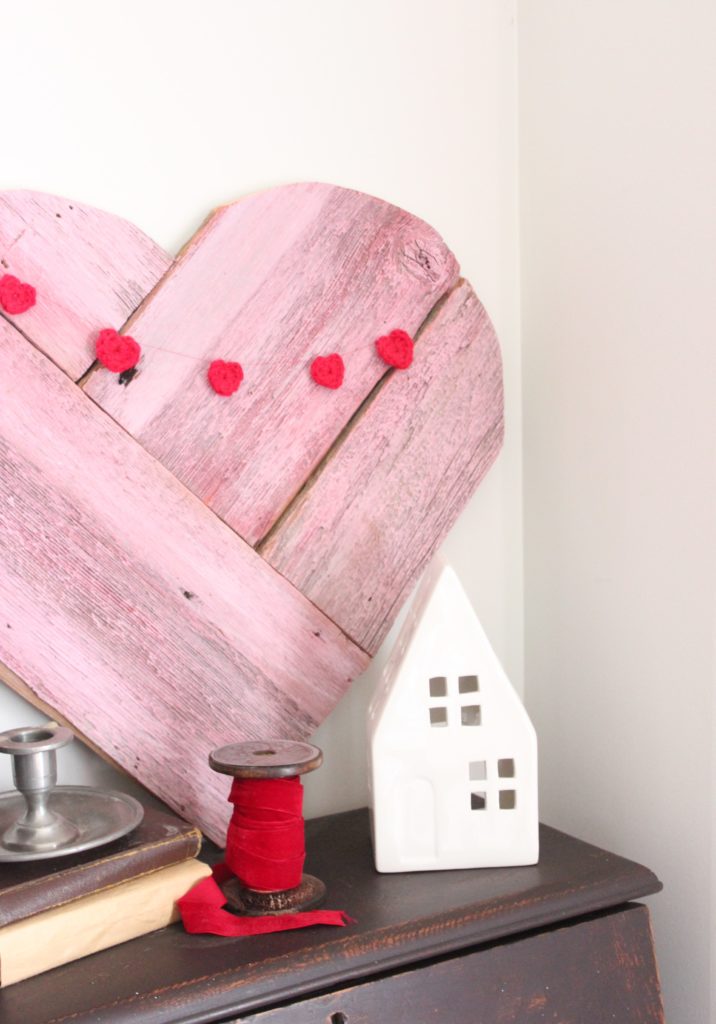
Then came the fun part….painting it!  I decided I wanted to dry brush paint on it so that the textures would really show through.  I had some tester posts of Fusion paint that were the right colours, Casement and Fort York!  I watered the paint down a little and dipped my brush in and got just a tiny bit on the bristles and then I started brushing that along the grain of the wood, blending the colours together so that there was variation in the pink tone I was creating.  I keep layering and mixing the colours as I worked the paint onto the boards.  I recalled the advice from an artist friend who told me to take it further than you think you need to.  So when I thought I was done, I added more red, then more white, working the colours into the pretty shade of pink.   Then, I stepped back and knew it was done and time to let it dry.

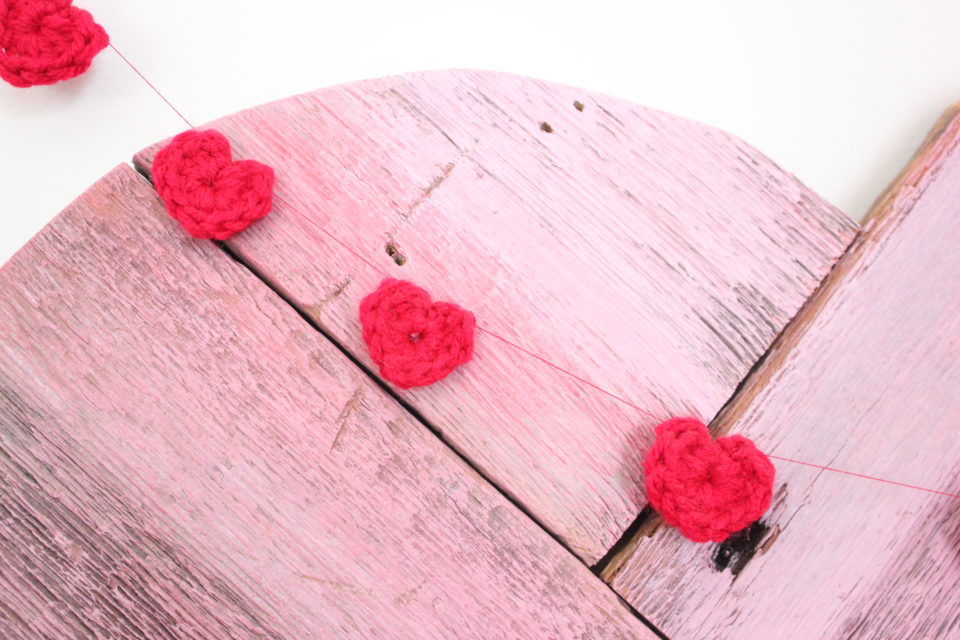
Since Valentine’s Day is nearby, I thought I would do up a little corner in the living room to celebrate.  The barn board heart took center stage on the cabinet.  Then I added a cute little house I picked up on sale after Christmas, crocheted hearts my friend made for me, a spool of velvet ribbon and a cluster of candles.  Perfect.

So, tell me – have you used barn board before?  Do you love it as much as I do? What’s your favourite way to use barn board?

To be continued,

Lori

Disclaimer: I was given the barn board by Phillips and Chestnut but my take on it is just that 😉

In Decorating/ Make Something/ Makeover

Lintel Coat Rack

Can one have too much storage?  Too many places to hang a coat? Too many hooks around the house? I thought not.

There is nothing worse than not having a hook for coat or bag when you need one.  I feel like I’m always looking for more way to incorporate more hooks in our house so that I’m not finding things laying on the floor.  So, today we’re partnering with Phillips & Chestnut again on a great project for around the house to help solve the storage issue with a great piece of salvage….a lintel. { You can read my first parntered post HERE }

Have you heard of a lintel?  Not to be confused with a lentil, that’s something completely different and I’m not much into showcasing recipes here.  According to Google, the source of all knowledge, a lintel is a horizontal support of timber, stone, concrete or steel across the top of a door or window.  They are sometimes also referred to as a Boston Header. So, once upon a time, this hung across the window or doorway of an old home.  And now?  Wellllll, it’s getting a makeover and a slight re-purpose so that it not only looks good, but has a function in our home.

I love the detail on this one, it has some great mouldings.  I did have to do a few little repairs, gluing a broken piece of trim back in place.  But it was an easy fix and being able to keep the gorgeous trim was a must.

I painted the lintel with a coat Miss Mustard Milk Paint.  My only prep work was a quick scuff sand, I’m pretty low on prep work.  Then I painted two quick coats of the mixed milk paint.  Now, I can’t tell you what the colour is, it’s a mix of Farmhouse White and Schloss, you know, use up the last bits of what you’ve already got mixed. 😉

After the two coats were dry, I gave it a light sand with 220 grit sandpaper.  I didn’t even bother sealing it.  It isn’t going to get hard use where I want to hang it { which is still up for debate… } and I love the raw paint finish.  I added some beautiful hand-forged hooks from R+R Handmade, a local blacksmith and artist couple whose work I greatly admire.  I love how simple they are!  And honestly, I had bought other hooks, but because of the depth of the moulding along the top, the hooks weren’t going to work.  So, Plan B was put into motion and I’m glad that Plan A didn’t work, I love this look and am so happy with the finished product.

With Christmas closing in on us, I styled it with a few stockings.  This is the perfect place to hang your stockings if you don’t have a fireplace in your home!  How sweet is this?  I’m loving this little vignette in my studio!  I almost hate to take it down and bring the stockings into the house for Santa to fill.

Here’s a close up of one of the handmade hooks by Ruben – I love the curl!

Sweet, eh?  I’m really pleased with how it turned out!  I love taking something old and forgotten and making it into something pretty and useful!  Repurposing or upcycling is so fun!  And a sweet place to hang stockings – even better!

Think if I find some more stockings for the house, Santa will fill them ALL?

To be continued,

Lori

PS I recieved free product for this blog post from Phillips and Chestnut, but my take on it all is just that 😉

3 In Make Something

Mexican Double Chocolate Biscotti

If you love a good cup of coffee and biscotti, or anything chocolate with a kick, then this recipe is for you!

I’m not one for dipping stuff in my coffee, I hate sludge at the bottom of my cup.  But then I was introduced to biscotti and I was ok with it.  I had been wanting to try making it for a while and when Janice gave me a recipe that had cayenne pepper in it…  I love my chocolate with a kick, whether it’s a bar or hot chocolate.  So, I knew this was the one to try!

Biscotti is pretty simple to make, it just takes some time. Basically, bake your ‘loaf’ and then cut it and bake it again.  I love recipes with simple, basic ingredients that I already have in my cupboard and that I know how to pronounce. 😉

Mexican Double Chocolate Biscotti

1 cup Butter

1 cup White Sugar

1 cup Brown Sugar

2 Eggs

2 cups Flour

1 cup Cocoa

1 tsp. Baking Soda

1 tsp. Cayenne Pepper

1/2 tsp. Salt

1 cup Chocolate Chips

Cream butter and sugar.  Beat in eggs.  Add dry ingredients and mix.  Stir in chips.  Let chill for 1 hour.

Form into 2 logs about 1 inch high, 3 inches wide and 14 inches long.  { I always forgot and make mine too wide and then they widen out even more during baking and make really long biscotti – don’t be like me…. }

Bake at 300 degrees for 30-35 minutes and let cool on a wire rack for 30 minutes.  Slice logs into 1/2 inch wide slices and lay on their side on the cookie sheet and bake for 15 minutes per side.  Let cool completely. Store in an airtight container.  Or just serve with piping hot coffee and good conversation.

I hope you enjoy this recipe.  I know I don’t share a lot of recipes here, but sometimes there’s one that needs to be shared with the world!  I love how warm and inviting our home smells when I bake!

So, tell me, who would you like to sit down and have a hot cup of coffee with and share some biscotti? I’m going to pick my friend Janice!!

To be continued,

Lori


In Make Something

Weaving with House of Woolly Thyme

Learning new skills is always fun.  Especially when it involves glorious wool and friends, both new and old.

Instagram is great for introducing you to lots of great talent.  I’m not sure when I started following House of Woolly Thyme { you can follow her, too HERE and see her website HERE } but her weavings really caught my eye.  When I heard she was offering classes along the south shore, where she lives, I asked if she ever travelled and taught elsewhere.  Long story short, November 18th was set for the date here in Pictou County.  And the class filled up completely in a very short time.

We had another location booked but due to unforeseen circumstances it fell through and we ended up at my favourite community hall ever – ours here in Meadowville where I host the Homegrown Vintage Market!!! Filled with loads of charm and the smell of a very recently cooked Hunters Breakfast, it was the perfect location for our weaving workshop.

Mary Ann of House of Woolly Thyme walked us through the weaving process, step by step and offered advice and suggestions as we weaved.  It’s amazing to me that you put the same supplies in front of a group of ten people and everyone creates something so different.  Even Darlene and Amanda, a mother-daughter duo, used the same colours and theirs are each very unique, too.  It’s fun to watch as people create and build their project to see how it evolves and grows and as techniques are learned and the process is repeated throughout the afternoon.  You could see their confidence grew!  Everyone was so pleased with what they had created!.

I’ve played around a tiny bit with weaving, it seemed like a good idea since I have a yarn collection that I don’t do anything with except make pom-poms.  I don’t knit, nor can I say that I really want to learn. Knitting doesn’t appeal to me but weaving sure does.  In fact, I have a Pinterest board dedicated to it. Surprised? No, I didn’t figure you would be. You can see it HERE.  I can’t wait to dig into my stash of yarn and wool and make more weavings!  Guess what everyone is getting for Christmas!??!?!

As we were setting up for the workshop, we were chatting and Meg and Mary Ann mentioned someone how makes jewellery with antlers and how cool it would be to do a weaving on an antler.  Now, Mary Ann had a delightful collection of drift wood to use for the weavings but something struck a chord when the antler was mentioned.  I had a single antler that was just sitting on a shelf.  It’s from one of the bucks the handsome Mr. Byrne had gotten.  I scooted home to grab it and brought it back to the hall and everyone agreed, it would be awesome.  I love how it combines two of the things that Michael and I love – his hunting and my creating.  Perfect!  And guys – look how awesome it turned out!

I wish I had’ve gotten a picture of our whole group together with their completed weavings.  But as some people finished up, they left while everyone else continued to work away.  But here are a few of the completed weavings.

I highly recommend taking a class to learn something new.  Creative skills are so awesome.  And with a great teacher, like Mary Ann, you can’t go wrong!  Maybe you’ll never do anything with it again, but maybe you will.  And maybe you’ll connect with a great group of people who love to make, too.  So, get out of your comfort zone, sign up for a class and MAKE SOMETHING!

To be continued,

Lori


5 In Decorating/ Make Something/ Makeover

Sap Bucket Makeover

We live in Atlantic Canada and Maple Syrup is a huge part our of culture, right?  I love me some maple syrup and the old sap buckets are plentiful and so handy!  

I’m excited to announce a new partnership happening here on the blog with one of my favourite stores – Phillips & Chestnut!  I love what Rosemary and Steve are doing in their store – the salvage products, the paint, the classes and the knowledge they share – so I’m thrilled to bits about this!  And I hope you are ready for lots of creative projects, too!  I’ve worked with them in the past on a few classes and projects, which you can read about HERE and HERE.  Plus, I toured their barn HERE and showed you want I took home HERE and a quick store tour HERE.

So, the first partnership project is showcasing a sap bucket but it isn’t so much about the sap bucket as the decoration ON the sap bucket.  But, I’m getting ahead of myself here, already!  I’m just too excited….

First things first – I painted the bucket.  I did zero prep, no washing, no sanding, no bonding agent in my paint. I like low/no prep projects like this! If the paint chipped in places, I was good with that.  I used Miss Mustard Seed Milk Paint in Mustard Seed Yellow, I thought about Farmhouse White but I did my test piece in that but I like colour, so I went with yellow, instead.

I wanted to try out the transfers on something that didn’t matter if I screwed it up, so I grabbed a flowerpot I had painted a thick, chunky layer of paint on and very easily rubbed the transfer on with no problem.  I actually cut it into sections so that I could easily get it to fit on the flowerpot. And I have to say how much I love how it turned out!

Then it was time for the transfer on the sap bucket.  These are something new that Phillips & Chestnut have started carrying from Iron Orchid Designs, but they remind me of scrapbooking supplies I had years ago.  You can check out them out HERE to see the complete line of their Decor Transfers.

I didn’t seal it before I applied the transfer.  I wanted to be sure the transfer was going to stick.  I just put my two coats of paint on and gave it a light sanding and wiped all the dust off. Then came the fun part, rubbing the transfer on.  I positioned the transfer and grabbed the handy dandy little stick they include and rubbed the image onto the sap bucket.  It’s so easy.  Just. Don’t. Move. It.  In fact, they recommend taping it down with some low-tack painters tape. I couldn’t find my painters tape so I used some washi tape instead 😉

There, it’s done!  You could seal it with a wax or sealer that doesn’t have harsh chemicals in it but, I’m ok with wear and tear on a project like this.

These sap buckets are great for decorating inside and out year round.  Pop some fresh flowers or blooming branches in for Spring.  They’re great for keeping some drinks on ice for summer time and in the fall, fill it to the brim with some gourds.  I love filling mine with different seasonal goodies and putting it on display.

All the products I used for this project are available at Phillips and Chestnut.  You know I love using Milk Paint, I enjoy the process of mixing my paint and the easy application of it, and they carry the complete line of Miss Mustard Seed Milk Paint.  The Iron Orchid Designs products are something new that they started carrying and I’m thrilled to be able to showcase them.  I received some of these products from them at no charge so I could demonstrate them for you but my take on the products is just that.  I’m already working on the next project! So stay tuned…

To be continued,

Lori